28 September 2014

How to install and configure Cristie TBMR to backup and recover a Linux systems from TSM server

Cristie Tivoli Bare Metal Recovery (TBMR) is a third party software which works together with IBM TSM BAclient software to backup system files and regular data files. When disaster occurs, Cristie TBMR with the help of TSM BAclient can able to restore the data files along with the operating system to its current backup state without the OS CD. 

Cristie TBMR backs up not only the data files, but the operating systems, applications, networks etc. along with all customizations and configurations as they were before the failure. It actually builds a perfect clone of your entire software infrastructure. TBMR backups can be taken periodically, along with configuration information, which includes details of hard disks, network interfaces, etc. It is possible to recover the original system to the same system or to another system with a dissimilar hardware. 

In this post, I will share how to use Cristie TBMR & TSM BAclient to save the system configuration information, backup and recover a Linux machine. TBMR for Linux can be installed on a x86, x86_64 or PPC Linux machine.

Cristie TBMR Limitations

TBMR for Linux does NOT support
  • Platforms other than Intel.

  • Multi-boot operating systems

  • Recovery of files that are being written to at the time of backup.

How to protect Linux systems using Cristie TBMR and TSM BAclient softwares

1) Install & Configure BA client on the client machine as usual.

2) Install TBMR on the client system you wish to protect.


3) Use the tbmrcfg command to capture and store the configuration of the system. 

4) Use the TSM BA Client to backup the data files & system configuration file generated in the above step to your TSM server.


Follow these below steps
  • First, the TSM BA client should be configured to backup all files which are required for OS recovery. By default, the /dev directory is not backed up. To make sure this is backed up, the following line should be added to the dsm.sys file:
               virtualmountpoint /dev

  • This will create a separate filespace for /dev which will be restored by the recovery        environment.
  • To save the system configuration information of the client machine, by default, the following command  tbmrcfg is used. It is recommended that this is run prior to running each BA client backup to ensure the configuration is up to date.
  • To save configuration information from a machine that boots using grub installed on /dev/sda to the backup location, use:
          tbmrcfg -b grub -d /dev/sda

  • To save configuration information from a machine that boots using grub installed on /dev/hda, use: 
         tbmrcfg -b grub -d /dev/hda


        You can also use man tbmrcfg command to check the syntax.

  • In order to ensure that you can recover to the latest version of the operating system that was installed on your Linux machine, you must ensure that a TSM incremental backup is performed every time the operating system files change. You have to run tbmrcfg commnad to generate new updated system configuration information in /TBMRCFG directory, this must be done before the backup is run to make sure that we have the latest system configuration backup along with client data files. The best recommended way is to add preschedulecmd parameter with tbmrcfg in dsm.sys file value as shown below.
              preschedulecmd tbmrcfg
  • System configuration information is always saved to /TBMRCFG directory, it can't be saved anywhere else. We have to make sure to backup this directory during our regular BA client backups.

How to recover a Linux machine using Cristie TBMR and TSM BAclient softwares

Below are the following steps to recover the Linux machine to its current backup state
  • Boot into Recovery environment (using ISO file which you have downloaded) and configure as required.
  • Read Configuration Data from your backup

  • Restore Files from your backup

  • Load additional drivers (if necessary)

  • Reboot into recovered OS
When the client machine is crashed, it can be recovered using the TBMR bootable CD-ROM. This is the same CD from which you have installed the software. You should ensure your machine’s BIOS is set up to boot from CD-ROM. You will see a screen as below.

Cristie TBMR recovery console on LINUX

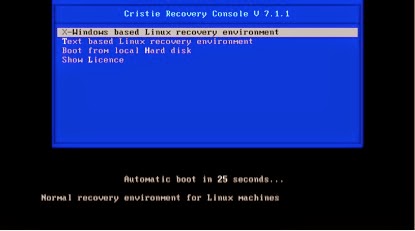
You can choose which method you want to use for recovering the system, GUI or text based. GUI is the easiest one. If you select the X-window based recovery option, you should see a screen as below.

TBMR on linux recovery

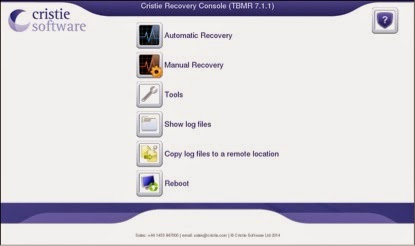
Here also, you can choose Automatic recovery or Manual Recovery option. Before starting you first need to setup network information in the tools tab. Watch the below video to know how to recover an Linux system to its current backup state using Cristie TBMR.


Note:

  • If the machine fails to boot after the restore, you can raise a cristie support request. Cristie support will require copies of the log files to diagnose any problems. Log files has exactly what has happened during the recovery on your system. Without them, it is very difficult to troubleshoot. The Location of log files is /var/log/cristie/recovery/
  • In our case, the NIC drivers for the NIC card we are using are not included in the recovery ISO, Cristie can help you to fix this kind of issues, they gave us a new customized recovery ISO file suitable for our environment. So, it is recommended to check the recovery on a test system before implementing on a production server.
  • You can download Cristie TBMR trial version software from their website and test it for 30 days. Then you have to update the license information to extend it. Updating license info can be done online from the portal or manually on client system. As of my experience, they gave good customer service.

18 September 2014

How to make dsmcad service startup automatic during system reboot in Linux OS (32 bit and 64 bit)

Automatic TSM scheduler (dsmcad service) should be enabled in order to take the backup of the client systems automatically, and this service should be able to restart itself even when the system reboots. In Linux systems until TSM V5, we have to make an entry in the /etc/inittab as follows

cad::once:/opt/tivoli/tsm/client/ba/bin/dsmcad >/dev/null 2>&1 # TSM scheduler

You can use the same settings for both 32-bit and 64-bit Linux operating Systems.

Automatic dsmcad service startup from TSM V6

But, starting with TSM V6 the BA client package comes with a default dsmcad script which can be used to make the dsmcad service automatic during system reboot. 

Automatic dsmcad service startup in Linux 64-bit systems

On a Redhat linux 64-bit system, adding corresponding scripts for the Tivoli Storage Manager client acceptor daemon, dsmcad, is a standard way to perform necessary administrative tasks like starting, stopping or restarting dsmcad and/or dsm scheduler using standard linux service start/stop/restart for automatic or manual operations.

  • The default dsmcad script will be added into the /etc/init.d directory during BA client installation. You can check by using 
          # cd /etc/init.d
          # ls -ltr

  • Next, we have to run the script to start the service.
          # service dsmcad start
      
           You can check the status of the service by using ps -ef | grep -i dsm command

  • Now to make the service automatic during reboot, run the following command.
         # chkconfig --add dsmcad

        Next time when your server reboots, dsmcad service also starts automatically.

Automatic dsmcad service startup in Linux 32-bit systems

On 32-bit systems, the dsmcad script doesn't work properly, I dont know why but I know the work around. You need to do some extra steps to make the dsmcad service automatic. There might be other methods to make this possible too, this is just one of them.

1) Copy rc.dsmcad script from another 64bit machine to 32 bit machine to 

    /opt/tivoli/tsm/client/ba/bin

2) Then create a soft link as shown below

     # ln -s /opt/tivoli/tsm/client/ba/bin/rc.dsmcad /etc/init.d/dsmcad

3) Now run the following commands, using the /sbin/chkconfig command

    Add dsmcad
    # /sbin/chkconfig --add dsmcad

    Start dsmcad in runlevels 3 and 5 only
    # /sbin/chkconfig --level 35 dsmcad on

    Verify what runlevels are enabled for dsmcad
    # /sbin/chkconfig --list dsmcad

4) After the above step you can start the service 

    To start dsmcad manually run:
    # service dsmcad start

    To stop dsmcad run:
    # service dsmcad stop

   To restart dsmcad (for example to refresh daemon after dsm.sys or dsm.opt modification) 
    # service dsmcad restart

    To check if dsmcad is running run
    # service dsmcad status
    -or-
    # ps -ef | grep dsmcad

5) Finally run this command to make it automatic restart during reboot.

     # chkconfig --add dsmcad 

Note: It is a good practice to add the errorlogname parameter in dsm.sys file to run the dsmcad service automatically. Sometimes this might cause a problem too.

17 September 2014

How to install BA Client on Ubuntu OS and run automatic dsmcad service during system startup

IBM doesn't provide the TSM BA client software package for the Ubuntu Operating System but we have the work around for it. If you want to install BA client on Ubuntu systems and schedule a backup follow the below steps. In this post I will share the steps to install TSM BAclient software and then steps to start automatic dsmcad service during system startup. It is recommended to first check it on a test machine and then go for production.

Procedure to install TSM BA client software on Ubuntu Systems

  • Since ubuntu is one of the Linux flavor, we have to download the suitable BA client software for Linux (32 bit or 64 bit). Download them and copy them into one folder.
  • Next, we have to install alien (rpm2deb converter tool) packages by running the below command. For this we need to have internet connection with firewall disabled. This tool is used to convert the Linux RPM packages to Ubuntu Debian package.
          apt-get install alien libstdc++5 ia32-libs
  • Now, we have to create the .deb install packages by converting .rpm to .deb packages. Use the --scripts to convert the inbuilt scripts into .deb package. Please double check the package names you have downloaded, they might have different names.


         alien -k --scripts gskcrypt64-8.0.14.14.linux.x86_64.rpm
         alien -k --scripts gskssl64-8.0.14.14.linux.x86_64.rpm
         alien -k --scripts TIVsm-API64.x86_64.rpm
         alien -k --scripts TIVsm-BA.x86_64.rpm
  • Now you can check by using ls -ltr comand if they are successfully converted to .deb   package.
  • Now we have to finally install all the .deb packages. You can install the packages one by one or all together by using the below command.
          dpkg -i *.deb

         The above command will install all the .deb packages in that particular directory
  • Finally, we have to manually link the Libraries to the right places as shown below so that the TSM client can find them. These linking process is automatically done on the Linux systems. Here we have to do it manually.       

ln -s /opt/tivoli/tsm/client/api/bin64/libgpfs.so /lib/ 
ln -s /opt/tivoli/tsm/client/api/bin64/libdmapi.so /lib/ 
ln -s /usr/local/ibm/gsk8_64/lib64/libgsk8cms_64.so /lib/ 
ln -s /usr/local/ibm/gsk8_64/lib64/libgsk8ssl_64.so /lib/ 
ln -s /usr/local/ibm/gsk8_64/lib64/libgsk8sys_64.so /lib/ 
ln -s /usr/local/ibm/gsk8_64/lib64/libgsk8iccs_64.so /lib/
ln -s /opt/tivoli/tsm/client/lang/EN_US /opt/tivoli/tsm/client/ba/bin/


  • From this step you can use the same procedure as we use to configure the linux clients. Configure dsm.sys and dsm.opt files and you can start taking the backup.

How to make automatic dsmcad service startup during Ubuntu system starttup

Generally on linux machines, we use /etc/init.d/dsmcad script to enable automatic dsmcad service during system startup. But this script doesn't work in Ubuntu machines. The work around for this is shown below.

1) First, create /etc/event.d/dsmcad or /etc/init/dsmcad.conf  with the following content:

$ vi dsmcad.conf 

     # dsmcad

    # This service starts the Tivoli Storage Manager "dsmcad"

    start on runlevel [2345]
    stop on runlevel [!2345]

    script
            export LANG=en_US
            export LC_MESSAGES=en_US
            export LC_CTYPE=de_DE
    exec /opt/tivoli/tsm/client/ba/bin/dsmcad  >/dev/null 2>&1
    end script

    # end of dsmcad

2) If you did not gave errorlogname parameter in dsm.sys file, dsmcad service will not run. make sure you update dsm.sys file with 

errorlogname=/opt/tivoli/tsm/client/ba/bin/dsmerror.log

3) Now You can start the dsmcad service with following command

    $ start dsmcad