Showing posts with label Video Tutorials. Show all posts

How to improve performance when taking backup to cloud storage pools (hybrid cloud backup) - Video tutorial

Since IBM now supports various cloud storage services to take the backups, you can use cloud container storagepools to store both the deduplicated data and non-deduplicated data and restore the data as required.  Starting from IBM Spectrum Protect  (TSM) V 7.1.7, you can configure cloud-container storage pools on 4 of the popular and widely used cloud based object storage systems to backup the data. However, the backup performance of a cloud-container storage pool largely depends on the network connections between the server and the cloud. Sending data to cloud storage requires good network bandwidth along with the advanced security features. But most of the small and medium sized organisations cannot afford to buy the high network bandwidths if they want to use cloud as the storagepool destinations. 

To address this situation, IBM has introduced a new hybrid and optimised data transfer techniques. You can now define local storagepool directory by using the new DEFine STGPOOLDIRectory command where the data is stored temporarily before it is transferred to the cloud. This technique is generally referred as hybrid cloud backup. This hybrid cloud backup feature will help you to set up local storage for data that is later moved to the cloud. By assigning one or more local storage directories to a cloud-container storage pool, you can enhance the performance of backup operations to the cloud. When you back up the data to local storage, the data is buffered efficiently into disk containers and moved to the cloud as larger objects. With larger objects, you can achieve better performance results. Use this command to define one or more directories in a directory-container or cloud-container storage pool.
How to improve backup performance when taking backup to cloud storage pools

For Example: define stgpooldirectory pool1 /storage/dir1,/storage/dir2

When you define a local storage directory, data is temporarily stored in the directory during data ingestion, and is then moved to the cloud. you can set up local storage for data that is later moved to the cloud. By assigning a local storage directory to a cloud-container storage pool, you can enhance the backup performance of small objects, for example, client-transaction data.


After you define a cloud-container storage pool, create one or more directories that are used for local storage. You can temporarily store data in local storage during the data ingestion, before the data is moved to the cloud. In this way, you can improve system performance. 

Watch the below video on how to configure cloud services to configure hybrid cloud backups in 3 simple steps by using IBM Spectrum Protect and Amazon S3.

How to configure storage pool on a Cloud Storage services - Video tutorial

Starting from IBM Spectrum Protect  (TSM) V 7.1.7, you can configure cloud-container storage pools on 4 of the popular and widely used cloud based object storage systems to backup the data. IBM supports the following cloud based object storage systems to configure storagepools and to take backup of the clients and to improve server performance, simplify storage management, and secure data by using encryption.
  • Amazon S3
  • Cleversafe
  • IBM SoftLayer
  • OpenStack Swift
You can use cloud container storagepools to store both the deduplicated data and non-deduplicated data and restore the data as required. However, before configuring the cloud container storage pool, you need to get the required account information details of the cloud environment which you want to use as the destination.

Also Read: What is Cloud Container Storagepool ?

Cleversafe
If you want to configure cloud-container storage pools on Cleversafe, you must first set up a Cleversafe vault template and a Cleversafe user account, and then obtain the below configuration information.
  • CLOUDTYPE: S3
  • IDENTITY: access_key_ID
  • PASSWORD: secret_access_key
  • CLOUDURL: http://cleversafe_accesser_IP_address
Cleversafe vaults are used in the same manner as containers in a cloud-container storage pool. Set up a Cleversafe vault template to quickly create vaults with your preferred settings. After you create a vault template, use the credentials from your Cleversafe user account to configure the storage pools in the Operations Center or with the DEFINE STGPOOL command. Tivoli Storage Manager uses the Simple Storage Service (S3) protocol to communicate with Cleversafe.

Amazon S3
If you want to use Amazon Simple Storage Service for cloud container storage pool, you must obtain information from Amazon that is required for the configuration process. Amazon S3 uses buckets to store data. Amazon S3 buckets are used in the same manner as containers in a cloud-container storage pool. Tivoli Storage Manager automatically creates a bucket in Amazon for an instance of Tivoli Storage Manager, and that bucket is shared by all pools for that instance.
  • CLOUDTYPE: S3
  • IDENTITY: access_key_id
  • PASSWORD: secret_access_key
  • CLOUDURL: Specify the region endpoint URL that best fits your location, based on the Amazon AWS Regions and Endpoints page.
OpenStack Swift
Similarly if you want to use OpenStack Swift, you must obtain configuration information from the OpenStack Swift computer. Use the credentials from your OpenStack Swift account when you configure the storage pools by using the Operations Center or the DEFINE STGPOOL command.
  • CLOUDTYPE: SWIFT or V1SWIFT
  • IDENTITY: OS_TENANT_NAME:OS_USERNAME
  • PASSWORD: OS_PASSWORD
  • CLOUDURL: OS_AUTH_URL
IBM SoftLayer
Similarly, if you use IBM SoftLayer, you must obtain configuration information from the SoftLayer Object Storage page. Use the credentials from your SoftLayer account when you configure the storage pool.
  • CLOUDTYPE: SOFTLAYER
  • IDENTITY: username
  • PASSWORD: API_key
  • CLOUDURL: public_authentication_endpoint

How to configure cloud container storage pool

Once you have the above required information, you can configure the cloud container storage pool by using both Operations Center and the command-line interface. However, the preferred way to define and configure a cloud-container storage pool is to use the Operations Center as it will be easier to configure and manage. Please watch the below video to understand how to do this. 

Also Read: How to restore damaged files in a primary storagepools from replication server automatically

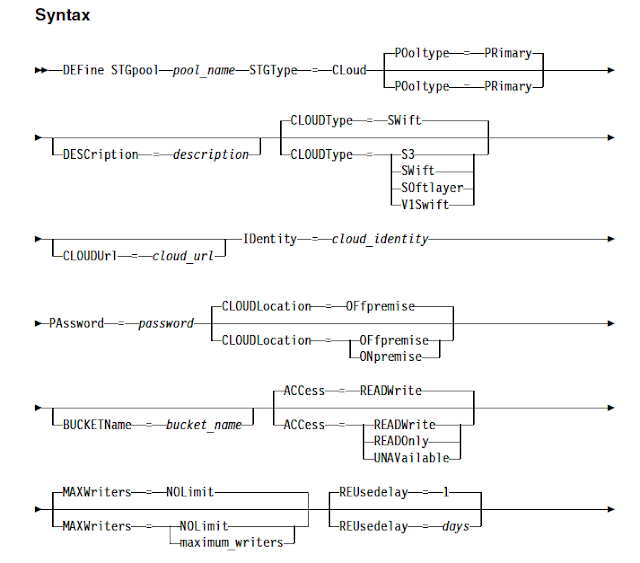
If you want to do it in a command line, use DEFINE STGPOOL command to configure cloud container storagepool in a cloud services platform.
How to configure cloud container storage pool

CLOUDType parameter specifies the type of cloud environment where you are configuring the storage pool. You can specify any one of the following values explained above. If you define a storage pool as using S3 with this parameter, you cannot later change the storage pool type by using the UPDATE STGPOOL command. If you do not specify the parameter, the default value SWIFT will be used.
CLOUDUrl specifies the URL of the cloud environment where you are configuring the storage pool. 
IDentity specifies the user ID for the cloud that is specified in the STGTYPE=CLOUD parameter. Based on your cloud provider, you can use an Access Key ID, a user name, a tenant name and user name, or a similar value for this parameter. 
PAssword specifies the password for the cloud that is specified in the STGType=CLoud parameter. Based on your cloud provider, you can use a Secret Access Key, an API Key, a password, or a similar value for this parameter.
CLOUDLocation specifies the physical location of the cloud that is specified in the CLoud parameter. You can specify OFFPREMISE or ONPREMISE if you have your own cloud setup. The default value is OFFPREMISE.
BUCKETName pecifies the name for an S3 bucket or a Cleversafe vault to use with this storage pool, instead of using the default bucket name or vault name. This parameter is optional, and is valid only if you specify CLOUDTYPE=S3

For example
define stgpool cloud_stg stgtype=cloud cloudtype=softlayer cloudurl=http://123.456.789:5000/ identity=admin:admin password=password 

Please watch the below video to configure cloud container storagepool on Amazon S3 platform by using operations center. You can use the same steps for other cloud platforms as well.

How to install and configure Data Protection for VMware V8.1 - Video Tutorial

Data Protection for VMware includes several components which you can install to protect your virtual environment. Before installing Tivoli Storage Manager for VE to protect your VMware infrastructure, you need to plan and decide how many Data Protection for VMware vSphere GUI's are required based upon your size of your environment. Depending on the operating system environment, the following Data Protection for VMware features are available for installation.


1) IBM Spectrum Protect recovery agent
This component provides virtual mount and instant restore capabilities.

2) Recovery agent command-line interface
The command-line interface used for mount operations.

3) Data Protection for VMware enablement file
This component enables IBM Spectrum Protect to run the following backup types:
  • Incremental-forever incremental backup
  • Incremental-forever full backup
This component is required for application protection. If you offload backup workloads, this file must be installed on the vStorage Backup Server.

See Screenshots: How to install TSM for Virtual Environment ?

4) Data Protection for VMware vSphere GUI
This component is a graphical user interface (GUI) that accesses VM data on the VMware vCenter Server. 

5) File restore GUI
This component is a web-based GUI that enables you to restore files from a VMware virtual machine backup without administrator assistance. The GUI is installed automatically when the Data Protection for VMware GUI is installed. It is enabled through the configuration wizard.

6) Data mover
The IBM Spectrum Protect data mover moves data for Data Protection for VMware. This functionality is referred to as the data mover. The data mover moves data from the virtual environment to the IBM Spectrum Protect server. When you install the data mover on a server, the server can be used as a vStorage backup server. You can install the data mover
on the same system as Data Protection for VMware or on another server.

Also Read: Different types of VM backups through BA Client command line

Watch the below 3 videos to understand the components of Data Protection for VMware V8.1 and the steps to be followed for installing and configuring the Data Protection for VMware V8.1 software.


How to install and configure Cristie TBMR to do bare metal recovery of Linux servers

Cristie Tivoli Bare Metal Recovery (TBMR) is a third party software which works together with IBM TSM BAclient software to backup system files and regular data files. When disaster occurs, Cristie TBMR with the help of TSM BAclient can able to restore the data files along with the operating system to its current backup state without the OS CD. Cristie TBMR backs up not only the data files, but the operating systems, applications, networks etc. along with all customizations and configurations as they were before the failure. It actually builds a perfect clone of your entire software infrastructure. TBMR backups can be taken periodically, along with configuration information, which includes details of hard disks, network interfaces, etc. It is possible to recover the original system to the same system or to another system with a dissimilar hardware. 

In this post, I will share how to use Cristie TBMR & TSM BAclient to save the system configuration information, backup and recover a Linux machine. TBMR for Linux can be installed on a x86, x86_64 or PPC Linux machine.

Also Read: 11 tips to increase restore performance

Cristie TBMR Limitations
TBMR for Linux does NOT support
  • Platforms other than Intel.

  • Multi-boot operating systems

  • Recovery of files that are being written to at the time of backup.

How to protect Linux systems using Cristie TBMR and TSM BAclient softwares

1) Install & Configure BA client on the client machine as usual.

2) Install TBMR on the client system you wish to protect.


3) Use the tbmrcfg command to capture and store the configuration of the system. 

4) Use the TSM BA Client to backup the data files & system configuration file generated in the above step to your TSM server.

Also Read: Use these Exclude options during backup to save storage pool space

Follow these below steps
  • First, the TSM BA client should be configured to backup all files which are required for OS recovery. By default, the /dev directory is not backed up. To make sure this is backed up, the following line should be added to the dsm.sys file:               virtualmountpoint /dev

  • This will create a separate filespace for /dev which will be restored by the recovery        environment.
  • To save the system configuration information of the client machine, by default, the following command  tbmrcfg is used. It is recommended that this is run prior to running each BA client backup to ensure the configuration is up to date.
  • To save configuration information from a machine that boots using grub installed on /dev/sda to the backup location, use:
            tbmrcfg -b grub -d /dev/sda

  • To save configuration information from a machine that boots using grub installed on /dev/hda, use: 
         tbmrcfg -b grub -d /dev/hda

        You can also use man tbmrcfg command to check the syntax.

  • In order to ensure that you can recover to the latest version of the operating system that was installed on your Linux machine, you must ensure that a TSM incremental backup is performed every time the operating system files change. You have to run tbmrcfg commnad to generate new updated system configuration information in /TBMRCFG directory, this must be done before the backup is run to make sure that we have the latest system configuration backup along with client data files. The best recommended way is to add preschedulecmd parameter with tbmrcfg in dsm.sys file value as shown below.
              preschedulecmd tbmrcfg
  • System configuration information is always saved to /TBMRCFG directory, it can't be saved anywhere else. We have to make sure to backup this directory during our regular BA client backups.

How to recover a Linux server using Cristie TBMR and TSM BAclient softwares

Below are the following steps to recover the Linux machine to its current backup state
  • Boot into Recovery environment (using ISO file which you have downloaded) and configure as required.
  • Read Configuration Data from your backup

  • Restore Files from your backup

  • Load additional drivers (if necessary)

  • Reboot into recovered OS
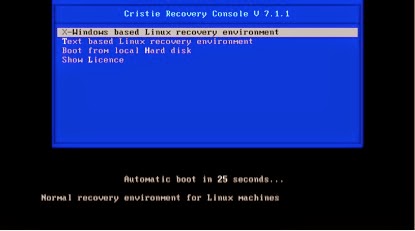
When the client machine is crashed, it can be recovered using the TBMR bootable CD-ROM. This is the same CD from which you have installed the software. You should ensure your machine’s BIOS is set up to boot from CD-ROM. You will see a screen as below.

How to install and configure Cristie TBMR to do bare metal recovery of Linux servers

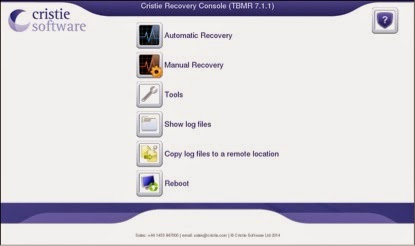
You can choose which method you want to use for recovering the system, GUI or text based. GUI is the easiest one. If you select the X-window based recovery option, you should see a screen as below.

TBMR on linux recovery

Here also, you can choose Automatic recovery or Manual Recovery option. Before starting you first need to setup network information in the tools tab. Watch the below video to know how to recover an Linux system to its current backup state using Cristie TBMR.


Note:
  • If the machine fails to boot after the restore, you can raise a cristie support request. Cristie support will require copies of the log files to diagnose any problems. Log files has exactly what has happened during the recovery on your system. Without them, it is very difficult to troubleshoot. The Location of log files is /var/log/cristie/recovery/
  • In our case, the NIC drivers for the NIC card we are using are not included in the recovery ISO, Cristie can help you to fix this kind of issues, they gave us a new customized recovery ISO file suitable for our environment. So, it is recommended to check the recovery on a test system before implementing on a production server.
  • You can download Cristie TBMR trial version software from their website and test it for 30 days. Then you have to update the license information to extend it. Updating license info can be done online from the portal or manually on client system. As of my experience, they gave good customer service.

Change these Kernel parameters before installing TSM server on HPUX to prevent installation failures - Video Tutorial

To properly install and configure the IBM Tivoli Storage Manager on HP-UX systems, you should first change the default value of some kernel parameters in HPUX. If you did not update these kernel parameters with suggested values, the installation of DB2 and Tivoli Storage Manager might fail. If these values are not set and the installation is still successful, operational issues might still be encountered when using the server in the future. So, it is always recommended to do this step before the start of the TSM server installation. Remember that after this step you need to reboot the system to get the kernel parameters updated with the new values. The initial default recommended kernel parameters and their values are 
semume       -  4000
maxdsiz_64bit    -  8,589,934,592
msgmnb       -  2,097,152
msgmni               -  32,767
msgtgl       -  262,144

IF you forget to change these parameter values before installation of TSM V6 server, you can still update them later but needs reboot of the system. To know the exact parameter values that need to be changed for proper working of DB2 instance use the db2osconf utility to get preferred changes based on the size of your system. The utility checks the settings of the kernel configuration parameters and suggests updates to improve performance. Follow these steps to do this
  • Go to /opt/tivoli/tsm/db2/bin
  • Run ./db2osconf -h
Also Read: Commands to manage TSM server on HPUX server

This gives an output based on your system settings and recommends to update the values as shown below
******************* System Resources ***********************

Physical RAM ==> 17158344704
Number of CPUS ==> 4
System Scale Factor ==> 4096.00

* Recommended HP-UX Kernel Parameters Based on this System *
nproc ==> 4112
maxuprc ==> 1371
max_thread_proc ==> 32767
maxfiles ==> 2048
maxfiles_lim ==> 65535
nflocks ==> 8192
ninode ==> 5734
msgmnb ==> 65535
msgtql ==> 3277
msgmni ==> 3277
semmns ==> 8193
semmni ==> 4096
semmnu ==> 4096
shmmax ==> 15442510234
shmmni ==> 4096
maxdsiz_64bit ==> 1900000000


****** Please Change the Following in the Given Order ******
WARNING[1]: maxuprc = 256. maxuprc should be set to 1371.
WARNING[2]: max_thread_proc = 1100. max_thread_proc should be set to 32767. 
WARNING[3]: maxfiles_lim = 4096. maxfiles_lim should be set to 65535. 
WARNING[4]: nflocks = 4096. nflocks should be set to 8192.
WARNING[5]: msgmnb = 16384. msgmnb should be set to 65535.  
WARNING[6]: msgtql = 1024. msgtql should be set to 3277. 
WARNING[7]: msgmni = 512. msgmni should be set to 3277. 
WARNING[8]: semmns = 4096. semmns should be set to 8193. 
WARNING[9]: semmni = 2048. semmni should be set to 4096. 
WARNING[10]: semmnu = 256. semmnu should be set to 4096. 
WARNING[11]: shmmax = 1073741824. shmmax should be set to 15442510234.
WARNING[12]: shmmni = 400. shmmni should be set to 4096.

As shown in the above output, you have to change those kernel parameter values accordingly. 

How to update Kernel Parameters for IBM TSM on HP-UX Video Tutorials

  • Login as Root, and run the sam command, (sam) is System Administration Manager.
  • Select Kernel Configuration.
  • Select Configurable Parameters.
  • Select the parameter that you want to change, and type the new value in the Formula/Value field and then Click OK.
  • Repeat these steps for all of the kernel configuration parameters that you want to change.
  • When you are finished setting all of the kernel configuration parameters, press x to exit 
After you change the values for the kernel configuration parameters, the HP-UX operating system might require reboot to get the new values activated.

Also Read: Run these commands to completely uninstall TSM Server

Commands for monitoring IBM TSM Server in HP-UX Operating System - Video Tutorial

Important and Useful commands which are used for monitoring and managing IBM Tivoli Storage Manager (TSM) on HP-UX machines are shown below in this post. You can also see the video tutorial on how to check the HP-UX system information for a IBM TSM. Remember that unlike monitoring IBM TSM in AIX, most of the commands are different and also the installation and device configuration methods are also bit different in HP-UX system. I recommend to check the requirements for TSM in HPUX before installing and configuring. 

Useful Commands for managing IBM TSM Server  in HP-UX

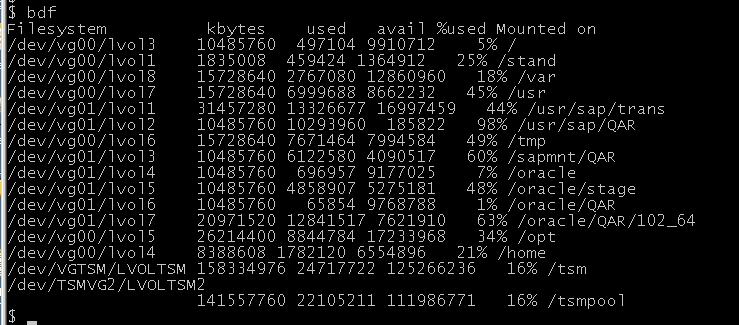
1) To Check the Filesystems and their size & information in HP-UX use ---- bdf command
Filesystems in HP-UX

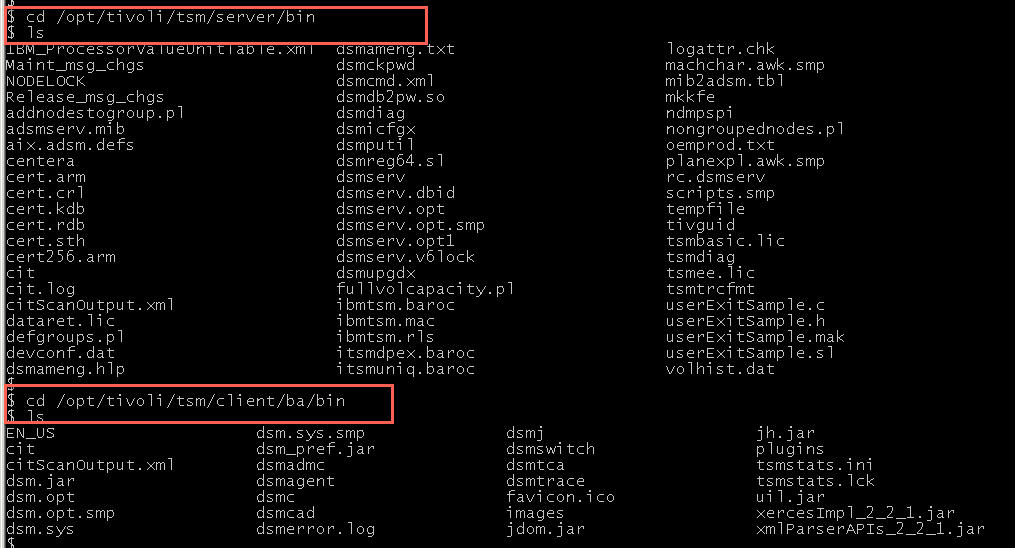
2) Tivoli Storage Manager default paths for Server and clients
      TSM Server - /opt/tivoli/tsm/server/bin
      BAClient - /opt/tivoli/tsm/client/ba/bin
      API Client /opt/tivoli/tsm/api/bin64

Also Read: SQL commands to query TSM Server

TSM server default path in HP-UX

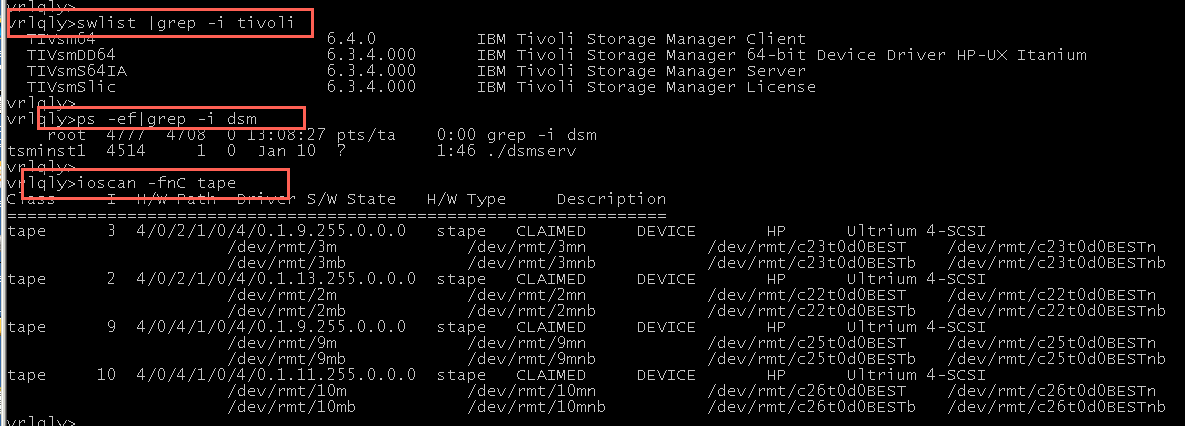
3) To check the installed software packages in HPUX use swlist command. To check only if TSM is installed or not use ----- swlist |grep -i tivoli

4) To check the process of TSM server, run the following command ------ ps -ef | grep -i dsm

5) To check the available tape devices in HPUX, run the following command ---- ioscan -fnC tape. This command will scan the attached tape devices and list them out as shown below.

ioscan -fnC tape

6) The above image shows the available tape drives list in Operating System level, to configure those tape drives in TSM you must go to /opt/tivoli/tsm/devices/bin and run the ./autoconf command to configure the devices to be used in IBM TSM. You can also use ./tsmdlst command to list the tape drives WWN number and Serial numbers as shown below

./autoconf

./tsmdlst

You should use the TSM device names shown in the above screen for example (/dev/rmt/tsmmt4) while defining path for the tape drives to TSM Server.

Also Read: TSM Administrator Daily routine tasks

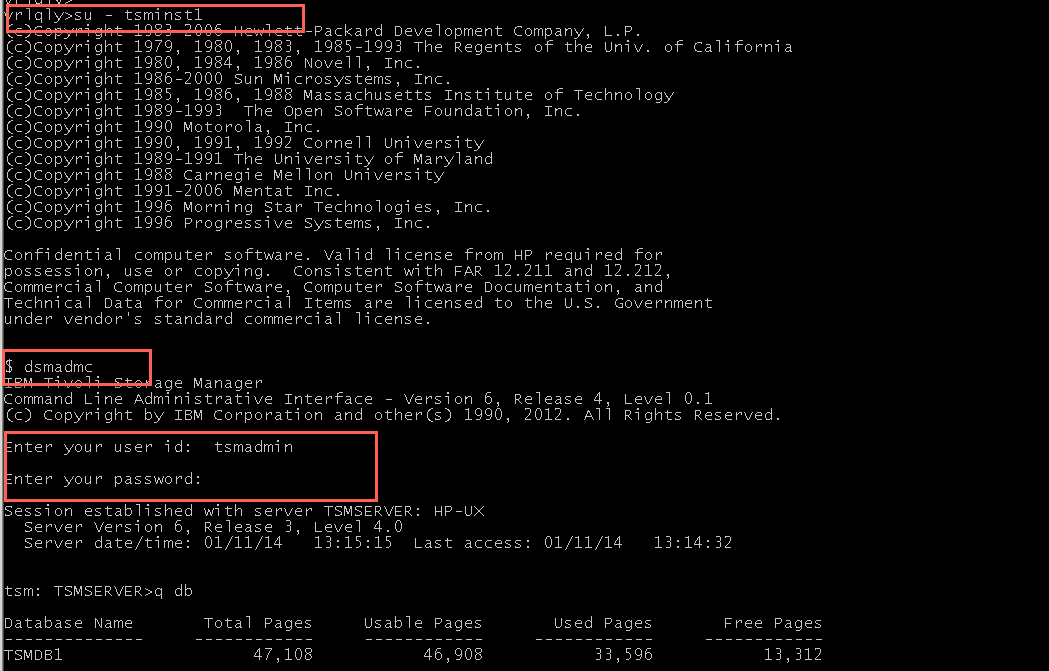
7) To login into the IBM TSM V6.3 server, it is always recommended to login as the TSM instance userid and run the dsmadmc command as shown in the below screen.

dsmadmc

Watch the below video tutorial for more detail on how to manage IBM Tivoli Storage Manager in HP-UX systems.

Also Read: Increase TSM server performance by following these guidelines

How to configure tape library in IBM Tivoli Storage Manager Server - Video Tutorials

To configure a Tape Library of any type you first have to physically attach the library and install the supporting Library Device Drivers according to the Operating System you are using. IF you want to use the Tape Library in sharing mode or for LANFree operations, you should Zone the library correctly such that all the TSM BA/TDP clients and TSM Server(s) can access the Tape Library devices.

In this below video you can learn how to check Tape Library devices in AIX machine and then configure those devices accordingly in IBM TSM Server for Backup/Restore Operations.

Also Read: Different types of libraries supported by IBM Spectrum Protect (TSM)

Commands used for Configuring TSM Tape Library in AIX Machine

To check device drivers ------ lslpp -l | grep -i atape

To check tape devices list  -----  lsdev -Cc tape, lscfg -vpl rmt*

To define Library and its path in a SAN mode
define library <libraryname> libtype=scsi shared=yes
define path <tsmservname> <libraryname> srctype=server destt=library device=/dev/smc0

To define tape drives and its path 
define drive <librname> <drivename>
define path <tsmservname> <drivename> srctype=server destt=drive  library=<libraryname> device=/dev/rmt0

Similarly, you have to define all the available drives and its path.

Then, the next step is to define the device class by using define devc command and then you can define the storagepools and start taking the backup.

Also Read: 15 tips to efficiently use the tape drive resources

How to use TSM Administration Centre for managing TSM servers ?

You can monitor or administer Tivoli Storage Manager (TSM) servers in both command line mode and GUI modes. The Administration Center is a Web-based graphical user interface for centrally configuring and managing IBM Tivoli Storage Manager server V5.3 and later, and V6.1, V6.2, and V6.3. To administer a Tivoli Storage Manager server using the Administration Center, the Administration Center must be the same or later version than the servers that you want to administer. For example, you can use a V6.3 Administration Center to administer a V6.2 server, but you cannot use a V6.2 Administration Center to administer a V6.3 server.

Also Watch: TSM Tutorial videos on Youtube Channel - Subscribe

The Administration Center is a task-oriented interface that replaced the previous administrative Web interface. The Administration Center provides wizards to help guide you through common configuration tasks. Using properties notebooks, you can modify settings and perform advanced management tasks. To be known as a good TSM administrator, you should be able to do administrative tasks in both command-line and GUI modes

TSM Administration Center Features 

  • You need to log in only once to access multiple Tivoli Storage Manager servers from a single interface.
  • You can easily monitor the health of your storage environment. Regular status updates are provided for Scheduled events, the server database and recovery log in server V5.3 and later.
  • The database manager in V6.1, V6.2, and V6.3 servers.
  • Storage devices, including information about off-line drives and paths, and mounted volumes.
  • You can filter and sort storage objects, such as client nodes and library volumes.
  • You can use wizards to more easily perform complex tasks, such as creating schedules to perform client node and administrative operations.
  • Creating a server maintenance script to perform database and storage pool backup, migration, expiration, and reclamation.
  • Configuring storage devices. A comprehensive wizard helps you create a library, add drives, check in media volumes, and create storage pools.
  • Configuring V6.1, V6.2, and V6.3 servers on local or remote UNIX systems.
Also Read: Storage Area Network (SAN) Basic Free Tutorials


Tivoli Data Protection (TDP) SAP HANA Backup and Restore Process Steps

SAP HANA writes the backup information (logs and data) to files at pre-configured directories. These directories must reside on GPFS file systems so the files can be accessed from all SAP HANA nodes. Also read the prerequisites for installing TDP SAP HANA product before configuring it on your servers to prevent any further issues.
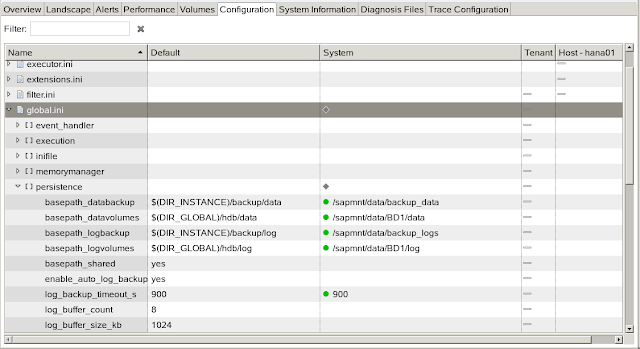
  • To change the default backup directories, edit the global.ini configuration file. The data backup files are written to the location specified by the parameter basepath_databackup in the persistence section of the global.ini configuration file. By default, the location for data backup files is $(DIR_INSTANCE)/backup/data.
  • The log backup files are written to the location specified by the parameter basepath_logbackup in the persistence section of the global.ini configuration file. By default, the location for log backup files is $(DIR_INSTANCE)/backup/log.

TDP SANA configuration steps
When the backup runs, the files created in these directories are moved to the Tivoli Storage Manager server. After the backup is complete, those files, which were created in the backup directories are deleted, with the exception of SAP HANA configuration files.

TDP SAP HANA Backup Steps

When you back up log and data files, the backup.sh command is run as SIDadm user. This command provides two functions:
  1. Complete data-backup (including HANA instance and landscape configuration files).
  2. Complete log-backup.
Backup of SAP HANA is done in 2 steps, first backup is taken from HANA to local disk and then TSM ERP will send to TSM Server storage with multiple streams. Go to directory /opt/tivoli/tsm/tdp_hana> 

"backup.sh --data" --------> Performs complete data and configuration file backup
"backup.sh --logs" --------> Performs complete redo log backup

TDP SAP HANA Restoration Steps

TDP SAP HANA Restoration process is done in 2 steps. First you should restore DB from TSM Server Storage and then recover it through SAP HANA Studio. As “sidadm” user run: 
'restore.sh ­mr'

restore.sh -mr” will restores the backups to the original location from which the backup was finished. Recovery of the database can be performed later using the so restored files.

TDP SAP HANA Backup and Restore Process Video Tutorial


Also Read: Storage Area Network (SAN) Basic Free Tutorials

Troubleshooting IBM Spectrum Protect (TSM) Server startup issues and useful TSM DB2 Commands

1) To find out the reason for the issue in the TSM Server, any TSM admin will use this below command to search the activity log. Activity log stores all the information regarding server processes and sessions. Use the following command to find the reason behind the issue.
Query actlog begindate=today-1 begintime=17:00 

2) To find the TSM Server startup issues use the dsmserv command in foreground. It will tell what went wrong to startup the TSM Server
In Windows - C:\program files\tivoli\tsm\server\dsmserv
In Unix (TSM 5.5) - # /usr/tivoli/tsm/server/bin/dsmserv
             (TSM 6, 7) - # /opt/tivoli/tsm/server/bin/dsmserv

3) To find the DB2 startup issues run db2start command in the foregraound. It will show what causing it to not start the db2.
In Windows - C:\program files\tivoli\tsm\db2\db2start

4) The db2error.log file will have all the errors regarding TSM DB2. Checking this file would help to fix the db2 problems.

TSM Server DB2 Commands

Run these commands only if you are aware of the expected o/p. otherwise dont risk of running the commands


CommandDescriptionExample
db2cmdOpens the command line processor DB2 window, and initializes the DB2 command-line environment.Open the DB2 command window:
db2cmd 
db2icrt
Creates DB2 instances in the home directory of the instance owner.
Tip: The Tivoli Storage Manager configuration wizard creates the instance used by the server and database. After a server is installed and configured through the configuration wizard, the db2icrt command is generally not used. Read also How to web design
 This utility is in the DB2DIR/instance directory, whereDB2DIR represents the installation location where the current version of the DB2 database system is installed.
 This utility is located in the DB2PATH\bindirectory where DB2PATH is the location where the DB2 copy is installed.
Manually create a Tivoli Storage Managerinstance. Enter the command on one line:
/opt/tivoli/tsm/db2/instance/
db2icrt -a server -s ese -u
instance_name instance_name
db2osconfChecks the settings of the kernel configuration parameters and suggests updates to improve performance. The suggested updates provided by thedb2osconf utility are the minimum settings required to run DB2 on your system.Retrieve a list of currently supported options:
db2osconf
db2setDisplays DB2 variables.List DB2 variables:
db2set
CATALOG DATABASEStores database location information in the system database directory. The database can be located either on the local workstation or on a remote database partition server. The server configuration wizard takes care of any catalog needed for using the server database. Run this command manually, after a server is configured and running, only if something in the environment changes or is damaged.Catalog the database:
db2 catalog database tsmdb1 
CONNECT TO DATABASEConnects to a specified database for command-line interface (CLI) use.Connect to the Tivoli Storage Managerdatabase from a DB2 CLI:
db2 connect to tsmdb1
GET DATABASE CONFIGURATION
Returns the values of individual entries in a specific database configuration file.
Important: This command and parameters are set and managed directly by DB2. They are listed here for informational purposes and a means to view the existing settings. Changing these settings might be advised by IBM support or through service bulletins such as APARs or Technical Guidance documents (technotes). Do not change these settings manually. Change them only at the direction of IBM and only through the use of Tivoli Storage Manager server commands or procedures.
Show the configuration information for a database alias:
db2 get db cfg for tsmdb1 
Retrieve information in order to verify settings such as database configuration, log mode, and maintenance.
db2 get db config for tsmdb1 
show detail 
GET DATABASE MANAGER CONFIGURATION
Returns the values of individual entries in a specific database configuration file.
Important: This command and parameters are set and managed directly by DB2. They are listed here for informational purposes and a means to view the existing settings. Changing these settings might be advised by IBM support or through service bulletins such as APARs or Technical Guidance documents (technotes). Do not change these settings manually. Change them only at the direction of IBM and only through the use of Tivoli Storage Manager server commands or procedures.
Retrieve configuration information for the database manager:
db2 get dbm cfg 
GET HEALTH SNAPSHOTRetrieves the health status information for the database manager and its databases. The information returned represents a snapshot of the health state at the time the command was issued. Tivoli Storage Manager monitors the state of the database using the health snapshot and other mechanisms that are provided by DB2. There might be cases where the health snapshot or other DB2 documentation indicates that an item or database resource might be in an alert state. Such a case indicates that action must be considered to remedy the situation. Tivoli Storage Manager monitors the condition and responds appropriately. Not all declared alerts by the DB2 database are acted on.Receive a report on DB2 health monitor indicators:
db2 get health snapshot for 
database on tsmdb1 
GRANT (Database Authorities)Grants authorities that apply to the entire database rather than privileges that apply to specific objects within the database.Grant access to the user ID itmuser:
db2 GRANT CONNECT ON DATABASE 
TO USER itmuser 
db2 GRANT CREATETAB ON DATABASE 
TO USER itmuser 
RUNSTATSUpdates statistics about the characteristics of a table and associated indexes or statistical views. These characteristics include number of records, number of pages, and average record length.
To see a table, issue this utility after updating or reorganizing the table.
A view must be enabled for optimization before its statistics can be used to optimize a query. A view that is enabled for optimization is known as a statistical view. Use the DB2 ALTER VIEW statement to enable a view for optimization. Issue the RUNSTATS utility when changes to underlying tables substantially affect the rows returned by the view.
Tip: The server configures DB2 to run the RUNSTATScommand as needed.
Update statistics on a single table.
db2 runstats on table 
SCHEMA_NAME.TABLE_NAME 
with distribution and sampled 
detailed indexes all 
 set db2instanceDetermines which instance applies to the current session.Determine which instance is applicable:
set db2instance=tsminst1 
SET SCHEMAChanges the value of the CURRENT SCHEMA special register, in preparation for issuing SQL commands directly through the DB2 CLI.
Tip: A special register is a storage area that is defined for an application process by the database manager. It is used to store information that can be referenced in SQL statements.
Set the schema for Tivoli Storage Manager:
 db2 set schema tsmdb1
START DATABASE MANAGERStarts the current database manager instance background processes. The Tivoli Storage Managerserver starts and stops the instance and database whenever the server starts and halts.
Important: Allow the Tivoli Storage Manager server to manage the starting and stopping of the instance and database unless otherwise directed by IBM support.
Start the database manager:
db2start 
STOP DATABASE MANAGERStops the current database manager instance. Unless explicitly stopped, the database manager continues to be active. This command does not stop the database manager instance if any applications are connected to databases. If there are no database connections, but there are instance attachments, the command forces the instance attachments to stop first. Then, it stops the database manager. This command also deactivates any outstanding database activations before stopping the database manager.
This command is not valid on a client.
The Tivoli Storage Manager server starts and stops the instance and database whenever the server starts and halts.
Important: Allow the Tivoli Storage Manager server to manage the starting and stopping of the instance and database unless otherwise directed by IBM support.
Stop the database manager:
db2 stop dbm 

Video Tutorial on TSM Server startup troubleshooting