26 January 2014

How to take backup and restore SQL databases using IBM TDP SQL to TSM Server Storage

To backup and restore your Microsoft SQL Databases using IBM Tivoli Data Protection for SQL you should first install compatible TDP SQL & TSM BA Client , configure and register a node in TSM Server accordingly. It is recommended to check the compatibility between your MS SQL Database, operating system and TDP SQL Versions. If possible try to install same version of BA Client & TDP SQL packages to escape annoying errors. TDP SQL offers different types of Backup and Restore methods to take the SQL database backup. To use VSS backup method to take your SQL database backup, you should have Volume Shadow Copy Services configured on your SQL Server machine.

Taking SQL Database Backup & Restore using TDP SQL GUI

1) Open TDP SQL GUI by going to START>PROGRAMMS>TIVOLI STORAGE MANAGER>TDPSQL GUI. You can also double click tdpsqlc.exe file to open GUI in C:Program Files/Tivoli/tsm/tdpsql folder.

2) Go to Backup Databases tab and select the database (left pane) and type of backup method to be used for the backup. Use the stripes option to increase/decrease the backup sessions. Ideally you should not use more than the tape drive mount points available in the tape library.

tdp sql gui

3) Make sure you select the correct database and database method according to your configuration and click BACKUP tab. If your configuration and TSM node details are correctly configured then the backup progress should be seen like below.

tdpsql backup gui

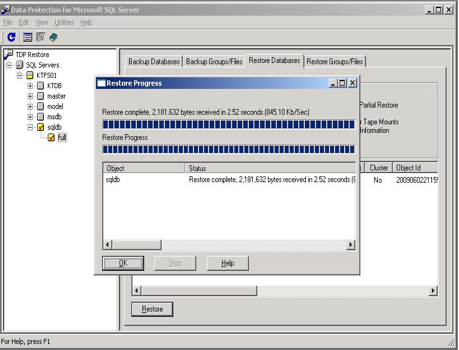
4) To restore the SQL Database backup, open the TDP SQL GUI in the same way and choose the RESTORE DATABASES, choose the required DB to be restored as shown below and click RESTORE tab.

TD SQL GUI Restore

5) If the restore process begins, you should see the screen as below.

TDP SQL restore GUI


Taking SQL Database Backup & Restore using TDP SQL CMD

1) Go to the C:Program Files/Tivoli/tsm/tdpsql directory  and run tdpsqlc backup command to back up all or part of one or more SQL databases from the SQL Server to Tivoli Storage Manager storage on the Tivoli Storage Manager server.

2) You can enter the * character to backup all databases. You can specify more than one database at once for multiple database and transaction log backups. For example

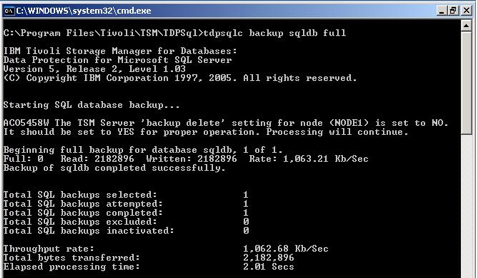
For Legacy Backup Method
tdpsqlc backup  <dbname> <full/diifffull/log>

For VSS Backup Method
tdpsqlc backup <dbname> <full> /backupdestination=local /backupmethod=vss

sql db backup using tdp sql cmd


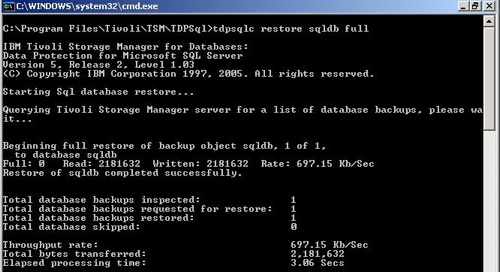
3) Use the restore command to restore all or part of one or more SQL databases. Use this command to restore all or part of one or more SQL databases from Tivoli Storage Manager storage to a SQL server. You cannot restore SQL databases currently in use. By placing SQL databases to be restored in single-user mode, you can avoid attempting such restores

tdpsqlc restore <db> <full> /fromsqlserver=STRINGVM1\STRINGVM1

tdp sql cmd restore


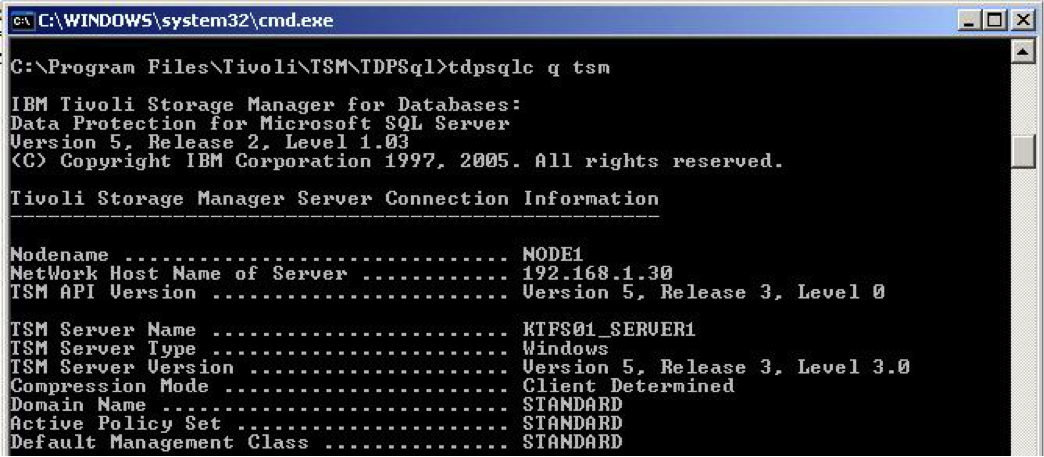
4) Use the query command to display information about the SQL server and its databases, about the Tivoli Storage Manager server and its backup objects, and about Data Protection for SQL.

tdpsqlc query tdp/tsm/sql <options>

5) Use the Query Managedcapacity command to assist with storage planning by determining the amount of managed capacity in use.

tdpsql  query managedcapacity <options>

22 January 2014

Changing required Kernel parameter values for IBM TSM V6 on HP-UX Operating System - Video Tutorial

To properly install and configure the IBM Tivoli Storage Manager Version 6 (TSM V6) on HP-UX systems, you should first change the default value of some kernel parameters in HPUX. If you did not update these kernel parameters with suggested values, the installation of DB2 and Tivoli Storage Manager might fail. If these values are not set and the installation is still successful, operational issues might still be encountered when using the server in the future. So, it is always recommended to do this step before the start of the TSM server installation. Remember that after this step you need to reboot the system to get the kernel parameters updated with the new values. The initial default recommended kernel parameters and their values are 

semume       -  4000
maxdsiz_64bit    -  8,589,934,592
msgmnb       -  2,097,152
msgmni               -  32,767
msgtgl       -  262,144


IF you forget to change these parameter values before installation of TSM V6 server, you can still update them later but needs reboot of the system. To know the exact parameter values that need to be changed for proper working of DB2 instance use the db2osconf utility to get preferred changes based on the size of your system. The utility checks the settings of the kernel configuration parameters and suggests updates to improve performance. Follow these steps to do this
  • Go to /opt/tivoli/tsm/db2/bin
  • Run ./db2osconf -h

This gives an output based on your system settings and recommends to update the values as shown below


******************* System Resources ***********************

Physical RAM ==> 17158344704
Number of CPUS ==> 4
System Scale Factor ==> 4096.00

* Recommended HP-UX Kernel Parameters Based on this System *

nproc ==> 4112
maxuprc ==> 1371
max_thread_proc ==> 32767
maxfiles ==> 2048
maxfiles_lim ==> 65535
nflocks ==> 8192
ninode ==> 5734
msgmnb ==> 65535
msgtql ==> 3277
msgmni ==> 3277
semmns ==> 8193
semmni ==> 4096
semmnu ==> 4096

shmmax ==> 15442510234
shmmni ==> 4096
maxdsiz_64bit ==> 1900000000

****** Please Change the Following in the Given Order ******

WARNING[1]: maxuprc = 256. maxuprc should be set to 1371.
WARNING[2]: max_thread_proc = 1100. max_thread_proc should be set to 32767. 
WARNING[3]: maxfiles_lim = 4096. maxfiles_lim should be set to 65535. 
WARNING[4]: nflocks = 4096. nflocks should be set to 8192.
WARNING[5]: msgmnb = 16384. msgmnb should be set to 65535.  
WARNING[6]: msgtql = 1024. msgtql should be set to 3277. 
WARNING[7]: msgmni = 512. msgmni should be set to 3277. 
WARNING[8]: semmns = 4096. semmns should be set to 8193. 
WARNING[9]: semmni = 2048. semmni should be set to 4096. 
WARNING[10]: semmnu = 256. semmnu should be set to 4096. 
WARNING[11]: shmmax = 1073741824. shmmax should be set to 15442510234.
WARNING[12]: shmmni = 400. shmmni should be set to 4096.

As shown in the above output, you have to change those kernel parameter values accordingly. 

How to update Kernel Parameters for IBM TSM V6 on HP-UX Video Tutorials

  • Login as Root, and run the sam command, (sam) is System Administration Manager.
  • Select Kernel Configuration.
  • Select Configurable Parameters.
  • Select the parameter that you want to change, and type the new value in the Formula/Value field and then Click OK.
  • Repeat these steps for all of the kernel configuration parameters that you want to change.
  • When you are finished setting all of the kernel configuration parameters, press x to exit 

After you change the values for the kernel configuration parameters, the HP-UX operating system might require reboot to get the new values activated.

Commands used for monitoring IBM Tivoli Storage Manager (TSM) Server in HP-UX Operating System

Important and Useful commands which are used for monitoring and managing IBM Tivoli Storage Manager (TSM) on HP-UX machines are shown below in this post. You can also see the video tutorial on how to check the HP-UX system information for a IBM TSM. Remember that unlike for monitoring IBM TSM in AIX, most of the commands are different and also the installation and device configuration methods are also bit different in HP-UX system. I recommend to check the requirements for TSM in HPUX before installing and configuring. 

Useful Commands for managing IBM TSM in HP-UX


1) To Check the Filesystems and their size & information in HP-UX use ---- bdf command

Filesystems in HP-UX

2) Tivoli Storage Manager default paths for Server and clients

      TSM Server - /opt/tivoli/tsm/server/bin
      BAClient - /opt/tivoli/tsm/client/ba/bin
      API Client /opt/tivoli/tsm/api/bin64

TSM server default path in HP-UX


3) To check the installed software packages in HPUX use swlist command. To check only if TSM is installed or not use ----- swlist |grep -i tivoli

4) To check the process of TSM server, run the following command ------ ps -ef | grep -i dsm

5) To check the available tape devices in HPUX, run the following command ---- ioscan -fnC tape. This command will scan the attached tape devices and list them out as shown below.

ioscan -fnC tape

6) The above image shows the available tape drives list in Operating System level, to configure those tape drives in TSM you must go to /opt/tivoli/tsm/devices/bin and run the ./autoconf command to configure the devices to be used in IBM TSM. You can also use ./tsmdlst command to list the tape drives WWN number and Serial numbers as shown below

./autoconf


./tsmdlst

You should use the TSM device names shown in the above screen for example (/dev/rmt/tsmmt4) while defining path for the tape drives to TSM Server.

7) To login into the IBM TSM V6.3 server, it is always recommended to login as the TSM instance userid and run the dsmadmc command as shown in the below screen.

dsmadmc

Watch the below video tutorial for more detail on how to manage IBM Tivoli Storage Manager in HP-UX systems.

16 January 2014

How to configure a tape library in IBM Tivoli Storage Manager Server - Video Tutorials

To configure a Tape Library of any type you first have to physically attach the library and install the supporting Library Device Drivers according to the Operating System you are using. IF you want to use the Tape Library in sharing mode or for LANFree operations, you should Zone the library correctly such that all the TSM BA/TDP clients and TSM Server(s) can access the Tape Library devices.

In this below video you can learn how to check Tape Library devices in AIX machine and then configure those devices accordingly in IBM TSM Server for Backup/Restore Operations.

Commands used for Configuring TSM Tape Library in AIX Machine

To check device drivers ------ lslpp -l | grep -i atape

To check tape devices list  -----  lsdev -Cc tape, lscfg -vpl rmt*

To define Library and its path in a SAN mode
define library <libraryname> libtype=scsi shared=yes
define path <tsmservname> <libraryname> srctype=server destt=library device=/dev/smc0

To define tape drives and its path 
define drive <librname> <drivename>
define path <tsmservname> <drivename> srctype=server destt=drive  library=<libraryname> device=/dev/rmt0

Similarly, you have to define all the available drives and its path.

Then, the next step is to define the device class by using define devc command and then you can define the storagepools and start taking the backup.


8 January 2014

How to install/upgrade and configure IBM Tivoli Data Protection (TDP) for Microsoft SQL Databases

Before you install IBM Tivoli Data Protection for Microsoft SQL (IBM TDP SQL), make sure you met all the hardware and software requirements. Check the following link to know the features of IBM TDP SQL. If you want to use VSS backups for backing up large SQL databases, you should also install IBM Tivoli Flash Copy Manager along with IBM TDP SQL software. You should also check the hardware and software requirements to install Tivoli Flash Copy Manager


Steps to Install and Configure IBM TDP SQL

The general and common requirements for a typical SQL database are mentioned below.

Hardware Requirements
1. At least 100MB of disk space
2. At least 7MB of disk space for each Language Pack

Software Requirements
1. Tivoli Storage Manager (TSM) Backup-Archive Client & The Tivoli Storage Manager (TSM) API Client compatible with TDP SQL & TSM Server.
2. Compatible Tivoli Data Protection for Microsoft SQL (TDP SQL).
3. Tivoli Storage FlashCopy Manager compatible with TDP SQL & TSM Server.

1) Installing IBM Tivoli Data Protection for Microsoft SQL

During TDP SQL installation the package will automatically installs prerequisites such as the .NET Framework and Report Viewer. Data Protection for SQL must be installed from an account that is a member of the local Administrators group for the machine on which the SQL server is running.

1) First, Log on as an administrator. Go to the path where the TDP SQL executable file is located and double click the .exe setup files. 

tsm tdp sql


tdp sql default path


2) Follow the installation instructions that are displayed on the screen. If you are configuring Data Protection for SQL in an SQL Server 2012 environment, enter a node name in the AlwaysOn Node field in the "TSM Node Names" page in the configuration wizard. This is the node name that is used to back up the availability database backups.


tdp sql installation step


3) Click Finish to complete the installation of Data Protection for SQL. If prompted for restart, click YES for restart. You can also use the Microsoft Installer program, msiexec.exe, to silently install Data Protection for SQL.

4) If you are installing Data Protection for SQL in a Microsoft Windows Failover Clustering environment or Veritas Cluster server environment, repeat the installation procedure on all nodes of your cluster.

5) If you are using a shared disk cluster, install Data Protection for SQL on all nodes on a disk that is local to each node and not on a shared cluster disk.

6) You can also upgrade from a previous version of the software by using the same procedure. After installing or upgrading the IBM Tivoli Data Protection for Microsoft SQL Database, the next step is to configure the TDP SQL to run a manual or scheduled SQL database backups. 

2) Configuring IBM Tivoli Data Protection for Microsoft SQL

To configure IBM Tivoli Data Protection for SQL (TDP SQL) for taking a manual or scheduled SQL database backups, first the compatible Data Protection for SQL must be installed on your system and a Tivoli Storage Manager server must be available to communicate with Data Protection for SQL. There are two methods to take a SQL database backup by using TDP SQL, Legacy backup and VSS backup. Legacy backup just need compatible TDP SQL and VSS backups require Tivoli Flash Copy Manager along with TDP SQL. You should first know the difference between TDP SQL Legacy and VSS backups to and choose the best backup method which suits your environment. Ideally if your database size is less go for Legacy backup.

Perform these steps on the system where the SQL Server is installed and running:

1) Specify your Data Protection for SQL node name and communication method in the dsm.opt file located (by default) in the Data Protection for SQL installation directory (C:\Program Files\Tivoli\tsm\tdpsql). Also copy the license file sqlclient.lic to (C:\Program Files\Tivoli\tsm\tdpsql) folder to register the license and check if installation was successfull. 


tdp sql licence file

Run the tdpsqlc command in the C:\Program Files\Tivoli\tsm\tdpsql command prompt to check all the settings as shown below ....

C:\Program Files\Tivoli\tsm\tdpsql\tdpsqlc


2) You can specify your Data Protection for SQL preferences (language, date format, log file) in the tdpsql.cfg file located in the Data Protection for SQL installation directory if you need any changes..

3) If you are configuring Data Protection for SQL in an SQL Server 2012 environment, specify the Tivoli Storage Manager node name that is used to back up the AlwaysOn availability databases. You can specify the AlwaysOn node name by using the alwaysonnode option in the tdpsql.cfg file. For example

set alwaysonnode myAlwaysOnNode

All availability databases in an availability group are backed up under this node name. Any stand-alone databases are backed up under the standard Data Protection for SQL node name.

4) For SQL Server 2012, If you want all databases to be backed up by default under the AlwaysOn node, specify the usealwaysonnode option in the tdpsql.cfg file. For example

usealwaysonnode yes

This option is useful if you are transitioning your database backups from the standard Data Protection for SQL node to an AlwaysOn node.

5) If not already done, define the policy domains, policy sets, management classes, copy groups, and storage pools needed to meet your Data Protection for SQL backup and restore requirements on TSM Server. For VSS operations, Tivoli Storage Manager server authentication must be ON.

6) Register your Data Protection for SQL node name and password with the Tivoli Storage Manager register node command. For example, for VSS operations, this node is the target node. When registering nodes to the Tivoli Storage Manager server specifically for VSS operations, do not specify the Tivoli Storage Manager USerid=NONE parameter. VSS operations fail when this parameter is specified.

7) Now we have to modify dsm.opt file which is in the tdpsql directory with the tdpsql node and TSM server details which we have defined in the previous step.


dsm.opt file parameters


8) Initially we have to store the TDP SQL node password. To do this we have to connect the TDP SQL node with TSM server as shown below. The easy way to store the PASSWORD locally is through GUI, open TDP SQL GUI using command “tdpsql”. From GUI, go to utilities and give “CHANGE PASSWORD”.


tdp sql password


9) Now, trigger the command “tdpsqlc q tsm” to check the communication between TSM SERVER and TDP SQL. This command will show complete details about the domain where the SQL node is registered and TSM SERVER version etc as shown below.


tdp sql connection checking

10) You can also issue other query commands at the command line to verify the TDP SQL installation and configuration.

Click Start > All Programs > Tivoli Storage Manager > Data Protection for Microsoft SQL Server > SQL Client - Command Line.

Enter the following commands:

                          tdpsqlc query tdp
                         
                          tdpsqlc query sql

11) Next step is to start taking the backup. You can do this manually or by defining schedule.


Upgrading TDP SQL V5.5 to TDP SQL V6.3 - Video Tutorial


1) First, copy all the important configuration files in C:Program files/tivoli/tsm folder to another secure location.

2) Uninstall old TDP SQL V5.5 & TSM BA Client version and install new TDP SQL V6.3 & TSM BA Client V6.3 version. Make sure to check the compatibilty between SQL Server, operating system and TDP SQL Versions. In this below video I am upgrading TDP SQL to V6.3.0 in Windows Server 2003.

3) You can use the same old configuration files or use new files for checking the connection between the TDP and TSM Server  and configure backups as shown previously.

4) Start the dsmcad schedule services to reschedule all the old backup schedules.