How to repair damaged data on the directory-container storage pool on a source server

IBM has introduced new set of commands to easily repair the damaged data on the directory-container storage pool on both source and target TSM servers when you enable replication techniques. By using these commands you can save lots of time and money which we spend on recovering the damaged storage pools earlier. You can use PROTECT STGPOOL, AUDIT CONTAINER and REPAIR STGPOOL commands to repair the damaged data on the directory-container storage pool on both source and target TSM servers. 

Infact, the repairing process of the directory-container storage pool  on the target server is done automatically by using the above commands. In this post we will see the steps to repair damaged data on the directory-container storage pool on a source server.

Steps to follow to repair damaged data on the directory-container storage pool on a source server

Step1: Enable protection manually or automatically

You can protect the storagepools by configuring automatic protection or manual protection. 
To enable storagepool protection automatically, specify the PROTECTSTGPOOL parameter on the DEFINE STGPOOL or UPDATE STGPOOL command to back up the data. For example
update stgpool prodpool protectstgpool=proddrpool

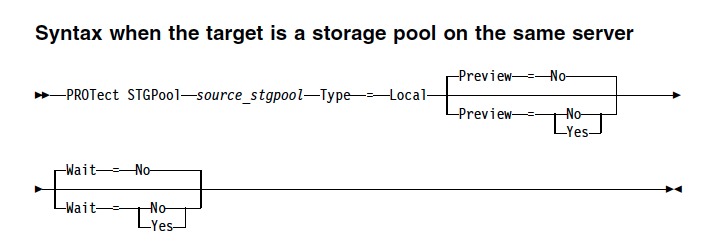
To enable storagepool protection manually, use PROTECT STGPOOL command to protect data in directory-container storage pools by storing the data in another directory-container storage pool on the target server. When you issue this command, data that is stored in the directory-container storage pool on the source server is backed up to a directory-container storage pool on the target server. You should issue this command on the server that is the source server for data.
How to repair damaged data on the directory-container storage pool on a source server

For example to protect a storage pool to a target replication server
protect stgpool devpool maxsessions=5

Use the FORCEREConcile parameter to specify whether to reconcile the differences between data extents in the directory-container storage pool on the source server and target server. If you specify NO to this option, the data backup does not compare all data extents in the directory-container storage pool on the source server with data extents on the target server. Instead, data backup tracks changes to the data extents on the source server since the last backup and synchronizes these changes on the target server. If you specify YES, the data backup compares all data extents on the source server with data extents on the target server and synchronizes the data extents on the target server with the source server.

Step 2: Repair the storagepool by using REPAIR STGPOOL command

If you notice any damage of data on the source storagepool, you can repair the storagepool by using REPAIR STGPOOL command


By protecting the directory-container storage pool, you can repair damaged storage pools by using the REPAIR STGPOOL command. It is used to repair deduplicated extents in a directory-container storage pool. Damaged deduplicated extents are repaired with extents that are backed up to the target server. 
repair stgpool command

For example, to repair a storage pool 
repair stgpool devpool maxsessions=5

You must issue the PROTECT STGPOOL command to back up data extents to the directory-container storage pool on the target server before you issue the REPAIR STGPOOL command. The REPAIR STGPOOL command fails when any of the following conditions occur:
  • The target server is unavailable.
  • The target storage pool is damaged.
  • A network outage occurs.

Limitations of enabling compression on TSM DB backups

Deduplication and replication techniques are server intensive processes and if you enable these techniques, you might additionally notice that your TSM DB size has been increased rapidly. If you are taking DB backups on a FILE or SERVER device class, it is obvious that you might require additional space to store the multiple versions of DB backups. This situation costs lots of disk space for the organizations and it might necessary to store the DB backups on disks if you have stringent recovery times. 

So in this kind of situations, you can enable compression when taking TSM DB backups.  By compressing volumes that are created during database backups, you reduce the amount of space that is required for your database backups.

How to enable compression for TSM DB backups

You can enable compression while running BACKUP DB command manually or you can enable the compression setting for all the DB backups by using SET DBRECOVERY command. For example, to enable compression for a full DB backup taking on to FILE device class
backup db devc=FILE type=full compress=yes


And the syntax for enabling compression for all backups automatically is


By default, the compress value is NO as shown above. You need to specify YES, to enable compression automatically for all DB backups. If you specify the COMPRESS parameter on the BACKUP DB command, it overrides any value that is set in the SET DBRECOVERY command. Otherwise, the value that is set in the SET DBRECOVERY command is the default.

Also Read: Taking TSM server DB backup when the server is down

Limitations of enabling compression during DB backup

  • This feature is valid only if you are planning to take DB backup on to a disk storage, generally FILE device classes. 
  • Using compression during database backups can reduce the size of the backup files. However, compression can increase the time that is required to complete database backup processing.
  • Also, it might take extra time to decompress the DB backup files during TSM DB restore. This will put additional pressure if it is a disaster recovery situation. The whole purpose of this setting is to save storage space only, not to increase DB backup performance.
  • Do not back up compressed data to tape. If your system environment stores database backups on tape, set the COMPRESS parameter to No in the SET DBRECOVERY and BACKUP DB commands.

Protecting directory-container storage pool by using new type of copy storagepool

IBM has frequently adding new features to Tivoli Storage Manager after they changed its name to IBM Spectrum Protect.  The 2 new storage pool types which are Directory Container Storagepool and Cloud Container storage pool types helps us to deduplicate data faster and also backup to cloud. 

Starting from Tivoli Storage Manager Version 7.1.7, another new storage pool type is added by which you can protect directory-container storage pools by copying the data to container-copy storage pools, where the data can be stored on tape volumes. Previously, you can only protect the data in directory-container storage pools by enabling replication. With this new type of storage pool, you can now copy data from directory-container storage pools to tape to send it to offsite location if required. 

Container-copy storage pool Overview

A container-copy storage pool is a new type of storage pool that provides an alternative to using a replication server to protect data in a directory-container storage pool. Container-copy storage pools can be used to repair minor to moderate directory-container storage pool damage, which includes damaged containers or directories. However, replication is the only way to provide complete disaster recovery protection for directory-container storage pools. With replication, you can directly restore client data from the target server if the source server is unavailable. You cannot create container-copy storage pools if you are using replication.

Also Read: What is Directory Container Storagepool ?

As per IBM, It is not recommended to use container-copy storage pools for disaster recovery protection, even in a small configuration. Repairing an entire directory-container storage pool, even for a small backup configuration, can take several days. Adding more drives or using the latest generation of tape technologies does not decrease the time that is required for the repair activity.

Also Read: What is Cloud Container Storagepool ?

Now lets see how to configure container-copy storage pool in both command line and Operations Center by using wizards.

Configuring container-copy storage pool by using commandline

1) To configure container-copy storage pool, you should first define at least one tape library to the server by using the DEFINE LIBRARY command. Provision enough tape drives and scratch volumes to meet your storage requirements. Also remember that Virtual tape libraries are not supported, regardless of which library type is defined. Only physical tape is supported.

2) Next you need to define container-copy storage pool by using DEFine STGpool command. Use the below syntax and optional parameters to define this

For example, 
define stgpool container_copy LTO6 pooltype=copycontainer maxscratch=100 reusedelay=30

PROTECTPRocess specifies the maximum number of parallel processes that are used when you issue the PROTECT STGPOOL command to copy data to this pool from a directory-container storage pool.

Also Read: TSM Storage Pool Concepts (V7 Revised)

3) Then you need to define or update the directory container storage pool with the container-copy storage pool to be used for protection. You need to update PROTECTLOCalstgpools parameter with the copy container storage pool name which you defined earlier. This will help you to automatically schedule the protection. 
update storagepool directory_stgpool  PROTECTstgpool =container_copy

PROTECTLOCalstgpools parameter specifies the name of the container-copy storage pool on a local TSM server where the data is backed up. You should update this parameter with copy container storage pool while defining the directory container storage pool. This container-copy storage pool will be a local target storage pool when you use the PROTECT STGPOOL command.

4) Next you can define a schedule, or use PROTECT STGPOOL command to manually protect the data in a directory-container storage pool by storing a copy of the data in the container copy storagepool.


For example
protect stgpool directory_stgpool  type=local

Configuring container-copy storage pool by using Operations Center

To configure storage pool protection to tape for an existing directory-container storage pool by using Operations Center, complete the following steps:
  • On the Operations Center menu bar, click Storage > Storage Pools.
  • On the Storage Pools page, select the directory-container storage pool that you want to protect to tape.
  • Click More > Add Container-Copy Pool.
  • Follow the instructions in the Add Container-Copy Pool window to schedule protection to tape.
Note that to copy the data in directory-container storage pools to tape, the Operations Center creates a schedule to run the PROTECT STGPOOL command. When the protection schedule runs, one tape copy is created. At least one volume must be available when the protection schedule runs. Otherwise, the operation fails.

Also Read: How to restore damaged files in a primary storagepools from replication server automatically

If you created a container-copy storage pool as part of the Add Storage Pool wizard, you do not have to use this procedure. When you completed the wizard, the Operations Center configured the container-copy storage pool and a protection schedule.

Check the below video to understand how to configure Container-Copy Pool and define a schedule to start protecting data in directory container storagepool by using OC wizards.

How to enable Archivelog Compression and how much storage space you can save

The TSM Archive log contains all the committed transactions of TSM DB and they are later moved to the TSM DB after the successful full DB backup. If you enable deduplication and replication techniques in your environment, it is possible that your archivelog size might frequently gets to 90%. Because of this condition, you need to schedule frequent full TSM DB backups to empty the archivelog directory. 

However, scheduling frequent TSM DB backups is not practically possible in medium or large sized TSM servers. The only way is to cancel the background server processes which are generating large transactions into the active log and archivelog for some time and then resume the processes again after successful full DB backup completion.


To ease this kind of situations, from Tivoli Storage Manager Version 7.1.1, you can enable compression of the archive log files that are written to the archive log directory. You can both enable or disable compression of archive logs on the Tivoli Storage Manager server at any time. By compressing the archive logs, you reduce the amount of space that is required for storage. You also reduce the frequency with which you must run a full database backup to clear the archive log.

How to enable compression for the Archive logs

Before you configure compression of archive logs, you must also consider the pros and cons of this feature. Since every TSM server has different hardware and software settings, the results that you achieve might differ, depending on the size of the archive log files. As per IBM testing results, If you enable archive log compression, you can get 57% of Archive log storage space reduction on Linux servers and whereas you can achieve 62%  of storage savings on windows servers.

Also you must be careful if you enable the ARCHLOGCOMPRESS server option on systems with sustained high volume usage and heavy workloads. Enabling this option in this system environment can cause delays in archiving log files from the active log file system to the archive log file system. This delay can cause the active log file system to run out of space. Be sure to monitor the available space in the active log file system after archive log compression is enabled.


If at anytime, the active log directory file system usage nears out of space conditions, the ARCHLOGCOMPRESS server option must be disabled by using the SETOPT command to immediately without halting the server.

You can enable archive log compress offline and online

To enable compression of the archive log files when the server is offline, include the ARCHLOGCOMPRESS server option in the dsmserv.opt file and restart the server. The ARCHLOGCOMPRESS server option specifies whether log files that are written to the archive directory for logs are compressed.
How to enable Archivelog Compression and how much storage space you can save
You can also enable archive log compression when the server is up and up and running by issuing the SETOPT  ARCHLOGCOMPress command as YES.

You can verify that compression is enabled by issuing the QUERY OPTION ARCHLOGCOMPRESS command.

How to enable different policy settings for the replicated data on the replication server

Node replication is the process in which the data that belongs to the specified client nodes or node groups is replicated from the source/production site to the target/DR site according to the replication rules that are previously defined. By default, the client node data on the target replication server was managed by policies defined on the source replication server. Files that are no longer stored on the source replication server, but that exist on the target replication server, are deleted during next scheduled replication process.

Taking this technique to the next level, IBM has given a new option where you can manage the data on replication server with customised retention settings. Starting from Tivoli Storage Manager Version 7.1.1, you can use the policies that are defined on the target replication server to manage replicated client-node data independently from the source replication server. When this feature is enabled, you can use the policies on the target replication server to 
  • Maintain more or fewer versions of replicated backup files between the source and target replication servers.
  • Retain replicated archive files for more or less time on the target replication server than they are being maintained on the source replication server.
Also Read: Understanding Management Class Binding and Management Class Rebinding

But to enable this feature, you must install Tivoli Storage Manager V7.1.1 on the source and target replication servers and then you must use the new command VALIDATE REPLPOLICY to verify the differences between the policies for client nodes on the source and target replication servers. Then, you can enable the policies on the target replication server.

Procedure to enable different policy settings on the replication TSM server

First, you must ensure that the policies that are defined on the target replication server are the policies that you want to manage replicated client-node data. Once you decide the policy settings which needed to be enabled on replication server, follow the below procedure to validate and enable the policy settings on the replication server.

1) Before you use the policies that are defined on a target replication server, you must issue the VALIDATE REPLPOLICY command for that target replication server. 
How to enable different policy settings for the replicated data on the replication server
This command displays the differences between the policies for the client nodes on the source replication server and policies on the target replication server. 

For example, to determine whether there are differences between the policies on the source replication server and the policies on the target replication server, DRTSM2, issue the following command
VALIDATE REPLPOLICY DRTSM2
Example Output:

Policy domain name on this             Policy domain name on target         Target server name                
Differences in backup copy group     STANDARD in management class       STANDARD
Change detected                                    Source server value                    Target server value
--------------------------------                         --------------------------------               -------------------
Versions data exists                                          2                                                8


Affected nodes                                                         
---------------------------------------------------------------------------
NODE1,NODE2,NODE3,NODE4,NODE5

Review the output of the command to determine whether there are differences between the policies on the source and target replication servers. Modify the policies on the target replication server as needed.

Also Read: How TSM Server determines the eligibility of files during different types of backup ?

2) Next, enable the target replication server policies by issuing the SET DISSIMILARPOLICIES command on the source replication server. 
How to enable different policy settings for the replicated data on the replication server
For example, to enable the policies on the target replication server, DRTSM2, issue the following command
SET DISSIMILARPOLICIES DRTSM2 ON

This command will enable the policies that are defined on the target replication server to manage replicated client-node data. If you do not use the policies on the target replication server, replicated client-node data is managed by policies on the source replication server by default.

How to restore damaged files in a primary storagepools using replication technique

Traditionally we use copy storagepool tapes to restore the damaged files in a primary storagepools. Initially we need to find which files are damaged in the primary storagepool and also find which copy storagepool tapes are needed from offsite in order to fix the damaged files. This procedure is a time consuming process as there is lot of physical activity and dependancy involved in it. To overcome this issue, starting from IBM TSM V7.1.1 we can automatically recover damaged files from a replication server if replication is enabled. When this feature is enabled, the system detects any damaged files on a source replication server and replaces them with undamaged files from a target replication server.

With Tivoli Storage Manager Version 7.1.1 and above versions, you can use node replication processing to recover damaged files. You can use the replication process to recover damaged files from that server. You can specify that the replication process is followed by an additional process that detects damaged files on the source server and replaces them with undamaged files from the target server.

You can also enable this feature for specific client nodes. With REGISTER NODE command or with the UPDATE NODE command you can specify whether data from damaged files is recovered automatically during the replication process. You can also specify a parameter on the REPLICATE NODE command for a single replication instance, you can start a process that replicates the node and recovers damaged files. Alternatively, you can start a replication process for the sole purpose of recovering damaged files.


After the node replication process is completed, a recovery process can be started on the target replication server. Files are recovered only if all the following conditions are met:
  • Tivoli Storage Manager, Version 7.1.1 or later, is installed on the source and target replication servers.
  • The REPLRECOVERDAMAGED system parameter is set to ON. The system parameter can be set by using the SET REPLRECOVERDAMAGED command.
  • The source server includes at least one file that is marked as damaged in the node that is being replicated.
  • The node data was replicated before the damage occurred.

Steps to restore or recover damaged files in the primary storagepools

1) First check the setting for recovering damaged files from a target replication server is turned on by issuing QUERY STATUS command
query status

For the above output, Recovery of Damaged Files parameter value should be ON. If the setting for recovering damaged files is OFF, turn it on by issuing the SET REPLRECOVERDAMAGED command and specifying ON
set replrecoverdamaged on

If the REPLRECOVERDAMAGED system parameter is set to OFF, and you change the setting to ON, an automatic scan of the Tivoli Storage Manager system is started. You must wait for the process to be completed successfully before you can initiate the recovery of damaged files by using the REPLICATE NODE command.

2) Now we can use REPLICATE NODE command with RECOVERDAMAGED parameter to recover the damaged files. When trying to recover the damaged files, you can use RECOVERDAMAGED parameter to run the full node replication process for a node or node-group and then recover the damaged files or you can only recover the damaged files without initiating a full node replication process. 
RECOVERDAMAGED parameter

For example, to run the full node replication process and recover damaged files for client nodes in the PROD group, issue the following command:
replicate node PROD recoverdamaged=yes

For example, to recover damaged files for client nodes in the PROD group without running the full node replication process, issue the following command:
replicate node PROD recoverdamaged=only

Note that the RECOVERDAMAGED parameter of the REPLICATE NODE command overrides any value that you specify for the RECOVERDAMAGED parameter at the node level. 

How to redistribute data and reclaim TSM DB space manually by using DB2 commands

If you did not redistribute the DB directories when you added them to the TSM server or if you used RECLAIMSTORAGE=NO when running EXTEND DBSPACE command, then you need to run the following DB2 commands to manually redistribute data and reclaim space from the old DB directories. 

The redistribution process, also known as rebalancing, only works with DB2 version 9.7 or later table spaces. Please note that the rebalancing process uses considerable resources and you need to follow the below tips before you start the procedure.
  • Run the process when the server is not handling a heavy workload.
  • To redistribute data to new directories, the storage paths must be able to host the directories and data. Make sure that sufficient disk space is available for the operation.
  • The time that is required to redistribute data and reclaim space might vary. File system layout, the ratio of new paths to existing storage paths, server hardware, and concurrent operations are all factors in determining the time requirement. Start the process with one small and one medium-sized table space and then try a larger table space. Use your results as a reference to estimate the time that is needed to process remaining table spaces.
  • Do not interrupt the process. If you try to stop it, for example, by halting the process that is completing the work, you must stop and restart the DB2 server. When the server is restarted, it will go into crash recovery mode, which takes several minutes, after which the process resumes.
  • For the best performance, rebalance a table space and then reduce the size for that table space. While the size for the first table space is being reduced, you can start rebalancing on the second table space to save some time.

Steps to redistribute or rebalance the TSM DB directories

Use the following steps to redistribute data and then reclaim space for each table space. 

1) Open the DB2 command line processor and issue the following command:
db2 connect to tsmdb1
2) List DB2 table spaces by issuing the following command. To display details about each table space, including the total size of a table space and how many bytes are used in each file system where the table space is located, include show detail.
db2 list tablespaces show detail
You only need to redistribute data on Database Managed Space (DMS) table spaces. The following example output shows where the table space type is identified:
Tablespaces for Current Database---------------------------------------------- Tablespace ID            = 0 Name                     = SYSCATSPACE Type                     = Database managed space  <---DMS table space. Contents                 = All permanent data. Regular table space. State                    = 0x0000 Detailed explanation: Normal
Also Read: Use this DB2 command to extend TSM DB space when the TSM server is down or unable to startup

3) Use the list that you obtained in Step 2 to identify each DMS table space. For each DMS table space, issue the following command to start redistribution of data for the first DMS space:
db2 alter tablespace tablespace_name rebalance 
For example : db2 alter tablespace SYSCATSPACE rebalance

4) Monitor the data redistribution progress by issuing the following command:
db2list utilities show detail

If the rebalance process is running, the command output shows Type = REBALANCE, and also indicates how many extents are moved and how many remain to be moved. The following example output shows where these details are displayed
ID = 6219Type = REBALANCE                   <--- Data is being redistributed.Database Name = AX4Partition Number = 0Description = Tablespace ID: 37Start Time = 04/27/2009 21:37:37.932471State = ExecutingInvocation Type = UserThrottling:Priority = UnthrottledProgress Monitoring:Estimated Percentage Complete = 15Total Work = 22366 extents         <--- Total extents to be moved.Completed Work = 3318 extents      <--- Total extents moved.Start Time = 01/03/2017 21:37
The value in the Completed Work field should increase as the redistribution progresses. The db2diag log also records status about the process, including start and complete time and what percentage of the process is complete at a certain time.

5) After the redistribution process is completed, reduce the size for each table space. During and after the operation, table spaces have a much larger total size because directories are added. Issue the following command
db2 alter tablespace tablespace_name reduce max
For Example: db2 alter tablespace SYSCATSPACE reduce max

How to add extra space to TSM DB for immediate use ?

The Tivoli Storage Manager server can use all of the space that is available to the drives or file systems where the database directories are located. To ensure that database space is always available, monitor the space in use by the server and the file systems where the directories are located. Use the QUERY DBSPACE command to display the number of free pages in the table space and the free space that is available to the database. If the number of free pages is low and there is plenty of free space available, the database allocates more space. However, if free space in drives or file systems is low, it might not be possible to expand the database and you need to add more directories or filesystems to increase the TSM DB space. You can increase the Tivoli Storage Manager database size upto 4 TB only. 

If you want to increase space for the database, you can create new directories and add them by two methods. 
  • By using EXTEND DBSPACE command when the server is online
  • By using DSMSERV EXTEND DBSPACE utility when the server is offline
By default these commands will allow the data to be redistributed across the new database directories and storage space in the old directories is reclaimed. This action makes the new directories available for use immediately and parallel I/O performance is improved. You should make sure that sufficient disk space is available for the operation and the new directories are empty. The process of redistributing data and reclaiming space uses considerable resources. 


However, if you do not want to redistribute data at the same time that you add directories, you can set the RECLAIMSTORAGE parameter in the EXTEND DBSPACE command to No. You can perform the tasks to redistribute data and reclaim space after the database size is increased, but the steps must be done manually.

Steps to add extra space to TSM DB when the server is up and running

To add the extra space to TSM DB when the server is online, use EXTEND DBSPACE command. The redistribution process as part of an operation to extend database space uses considerable system resources, so ensure that you plan for the process when the server is not handling a heavy workload. 
extend dbspace

Do not interrupt the redistribution process. If you try to stop it, for example, by halting the process that is completing the work, you must stop and restart the DB2 server. When the server is restarted, it will go into crash recovery mode, which takes several minutes, after which the redistribution process resumes.

1) Create one or more directories for the database on separate drives or file systems. How you spread the database directories across available disk storage has a strong effect on performance. Make all directories that are used for the database the same size to ensure parallelism. For most disk systems, performance is best if one database directory is on one LUN, which has one logical volume. Aim for a ratio of one database directory, array, or LUN for each inventory expiration process.

2) Make sure that there is no heavy background processes are running such as reclamation and expiration etc.

3) Then issue the EXTEND DBSPACE command to add the directory or directories to the database. The directories must be accessible to the user ID of the database manager. By default, data is redistributed across all database directories and space is reclaimed. For example
extend dbspace /tsmdb07/tsmdb08
To increase the size of the database without redistributing data and reclaiming space, issue the following command:
extend dbspace /tsmdb07,/tsmdb08 reclaim=no

The time that is needed to complete redistribution of data and reclaiming of space is variable, depending on the size of your database. Make sure that you plan adequately.

Also Read: How to increase or decrease TSM DB, active log and archive log size ?

4) You can Halt and restart the server or you might not need to restart the server to fully use the new directories. If the existing database directories are nearly full when a new directory is added, the server might encounter an out of space condition reported in the db2diag.log. This condition should be corrected by halting and restarting the server.

Steps to add extra space to TSM DB when the server is offline

Use DSMSERV EXTEND DBSPACE utility to add the extra space to the TSM DB when the server is offline. However, this utility performs the same function as the EXTEND DBSPACE command. 
dsmserv extend dbspace

1) Create one or more directories for the database on separate drives or file systems by following best practices (discussed above) to get optimal performance. The directories must be accessible to the user ID of the database manager. 

2) Go to the TSM server configuration files directory (/opt/tivoli/tsm/server/bin) and issue the DSMSERV EXTEND DBSPACE command to increase the TSM DB size. You can also specify whether data is redistributed across newly created database directories and space is reclaimed from the old storage paths when you add space to the database. This parameter is optional and the default value is Yes. But it is recommended to leave it as default to get optimal DB performance. For example on AIX and Windows
dsmserv extend dbspace /tsm_db/stg1 
dsmserv extend dbspace D: 

3) Restart the TSM server and check the DB size by issuing QUERY DBSPACE command.

How to increase TSM DB backup speed ?

We often notice that TSM DB backup runs very slowly even when TSM server is in idle state or having few background processes. There is a chance that this slow DB backup is due to the Transmission Control Protocol (TCP) loopback problems. To overcome this problem, now you can use shared memory setting to reduce processor load and improve throughput to increase the DB backup performance.

How to update the TSM server to use SHARED MEMORY for DB backup

We can manually configure a Tivoli Storage Manager server or use the instance configuration wizard, to use shared memory with DB2 backups. This option is only supported from TSM V7.1.0, configure the TSM server instance with shared memory to resolve slow database backup problems which can occur because of Transmission Control Protocol (TCP) loopback problems.

Also Read: TSM Storage Pool Concepts (V7 Revised)

In the following 2 step procedure, we must update the database backup node configuration for TSM server to enable shared memory. To update the server configuration files, we need to halt the TSM server. Make sure to cancel all the background processes and cancel the client sessions if any before halting the TSM server.

Next, we need to edit the below configuration files to update the above settings to enable SHARED MEMORY for DB backup operations. In AIX  modify  /usr/tivoli/tsm/client/api/bin64/dsm.sys file, In
HP-UX, Linux & Oracle Solaris  modify /opt/tivoli/tsm/client/api/bin64/dsm.sys and in Windows operating system modify d:\tsmserver1\tsmdbmgr.opt files with the below steps.

Also Read: How to increase TSM restore performance

Step 1 - Ensure that the server options file, dsmserv.opt, contains the following lines:
COMMMethod SHAREdmem
SHMPort         1510

Step 2- On UNIX and LINUX systems, modify the stanza for the database backup node in the client API system options file, dsm.sys.

Remove the following lines from the stanza:
COMMMethod TCPip
TCPServeraddress 127.0.0.1
TCPPort 1500 

Add the following lines to the stanza:
COMMMethod SHAREdmem
SHMPort 1510

On windows operating systems,  modify the stanza for the database backup node in the client API system options file, tsmdbmgr.opt.

Remove the following lines from the tsmdbmgr.opt file:
COMMMethod TCPip
TCPServeraddress 127.0.0.1
TCPPort 1500 

Add the following lines to the tsmdbmgr.opt file:
COMMMethod SHAREdmem
SHMPort 1510

Core Java Study guide and interview questions - Part 18

This is the 18th part of the 500+ Core JAVA interview questions and answers. These questions can also be used as a quick study guide for preparing for an interview or for any Core JAVA concepts revision. These questions cover all the topics in core JAVA from basics to advanced concepts.

51.To what value is a variable of the String type automatically initialized?
The default value of an String type is null.

52.How does Java handle integer overflows and underflows?
It uses those low order bytes of the result that can fit into the size of the type allowed by the operation.

53.What is the difference between method overriding and overloading?
Overriding is a method with the same name and arguments as in a parent, whereas overloading is the same method name but different arguments

54.What is the difference between a break statement and a continue statement?
A break statement results in the termination of the statement to which it applies (switch, for, do, or while). A continue statement is used to end the current loop iteration and return control to the loop statement.

55.Can a for statement loop indefinitely? 
Yes, a for statement can loop indefinitely. For example, consider the following: for(;;) ;

56.What is a transient variable?
transient variable is a variable that may not be serialized.

57.Why wait and notify is declared in Object class instead of Thread ?
Another tough java question, how can you answer this question if you are not designed Java programming language. anyway some common sense and deep knowledge of Java programming helps to answer such tough core java interview question. See this blog post to learn  Why wait and notify is declared in Object class and not in Thread.

58.Why multiple inheritance is not supported in Java ?
I found this core Java question really tough to answer because your answer may not satisfy Interviewer, in most cases Interviewer is looking for specific points and if you can bring them, they would be happy. Key to answer this kind of tough question in Java is to prepare topic well to accommodate any follow-ups. See Why multiple inheritance is not supported in Java for answer of this tough Java question.

59.Why Java does not support operator overloading ?
One more similar category of  tough Java question. C++ supports operator overloading than why not Java? this is the argument Interviewer will give to you and some time even say that + operator is overloaded in Java for String concatenation, Don't be fooled with such arguments. See  Why support operator overloading is not supported in Java for detailed answer of this tricky Java question.

60.Why String is immutable in Java?
My favorite Java interview question, this is tough, tricky but same time very useful as well. Some interviewer also ask this question as Why String is final in Java. look at this post for some points which make sense on Why String is final or immutable in Java

61.Why char array is preferred to store password than String in Java?
Another tricky Java question which is based on String and believe me there are only few Java programmer which can answer this question correctly. This is a real tough core Java interview question and again solid knowledge of String is required to answer this. see Why char array is better than String for storing password in Java to find out answer of this tough Java question.

62.How to create thread-safe singleton in Java using double checked locking?
This Java question is also asked as What is thread-safe singleton  and how to do you write it. Well Singleton created with double checked locking before Java 5 was broker and its possible to have multiple instance of Singleton if multiple thread try to create instance of Singleton at same time. from Java 5 its easy to create thread safe Singleton using Enum. but if interviewer persist with double checked locking then you have to write that code for them. remember to use volatile variable.  See 10 Java singleton interview question for more details on this topic.

63. What is the preferred size of a component?
The preferred size of a component is the minimum component size that will allow the component to display normally.

64. What is the Collections API?
The Collections API is a set of classes and interfaces that support operations on collections of objects.

65. Which containers use a FlowLayout as their default layout?
The Panel and Applet classes use the FlowLayout as their default layout.

66.What's new with the stop(), suspend() and resume() methods in JDK 1.2?
The stop(), suspend() and resume() methods have been deprecated in JDK 1.2.

67. What state does a thread enter when it terminates its processing?
When a thread terminates its processing, it enters the dead state.

68.Is null a keyword?
The null value is not a keyword.

69. Can a lock be acquired on a class?
Yes, a lock can be acquired on a class. This lock is acquired on the class's Class object.

70. What method is used to specify a container's layout?
The setLayout() method is used to specify a container's layout.

71. Which characters may be used as the second character of an identifier, but not as the first character of an identifier?
The digits 0 through 9 may not be used as the first character of an identifier but they may be used after the first character of an identifier.

72. What modifiers may be used with an inner class that is a member of an outer class?
A (non-local) inner class may be declared as public, protected, private, static, final, or abstract.

73. How does Java handle integer overflows and underflows?
It uses those low order bytes of the result that can fit into the size of the type allowed by the operation.

74. What is an Iterator interface?
The Iterator interface is used to step through the elements of a Collection.

75. What is the difference between the >> and >>> operators?
The >> operator carries the sign bit when shifting right. The >>> zero-fills bits that have been shifted out.

76. Which method of the Component class is used to set the position and size of a component?
setBounds()

77. Which java.util classes and interfaces support event handling?
The EventObject class and the EventListener interface support event processing.

78. What is the List interface?
The List interface provides support for ordered collections of objects.

79.What is the difference between yielding and sleeping?
When a task invokes its yield() method, it returns to the ready state. When a task invokes its sleep() method, it returns to the waiting state.

80. What is the Vector class?
The Vector class provides the capability to implement a growable array of objects

81. Is sizeof a keyword?
The sizeof operator is not a keyword.

82. How many bits are used to represent Unicode, ASCII, UTF-16, and UTF-8 characters?
Unicode requires 16 bits and ASCII require 7 bits. Although the ASCII character set uses only 7 bits, it is usually represented as 8 bits. UTF-8 represents characters using 8, 16, and 18 bit patterns. UTF-16 uses 16-bit and larger bit patterns.

83. Can an object's finalize() method be invoked while it is reachable?
An object's finalize() method cannot be invoked by the garbage collector while the object is still reachable. However, an object's finalize() method may be invoked by other objects.

84. What value does readLine() return when it has reached the end of a file?
The readLine() method returns null when it has reached the end of a file.

85. What is a native method?
A native method is a method that is implemented in a language other than Java.

86. What are wrapped classes?
Wrapped classes are classes that allow primitive types to be accessed as objects.

87. What is the immediate superclass of the Dialog class?
Window

88. Can a for statement loop indefinitely?
Yes, a for statement can loop indefinitely. For example, consider the following: for(;;) ;

89. What is clipping?
Clipping is the process of confining paint operations to a limited area or shape.

90. What is the difference between preemptive scheduling and time slicing?
Under preemptive scheduling, the highest priority task executes until it enters the waiting or dead states or a higher priority task comes into existence. Under time slicing, a task executes for a predefined slice of time and then reenters the pool of ready tasks. The scheduler then determines which task should execute next, based on priority and other factors.

91. Does garbage collection guarantee that a program will not run out of memory?
Garbage collection does not guarantee that a program will not run out of memory. It is possible for programs to use up memory resources faster than they are garbage collected. It is also possible for programs to create objects that are not subject to garbage collection

92.What restrictions are placed on the location of a package statement within a source code file?
A package statement must appear as the first line in a source code file (excluding blank lines and comments).

93. Name three Component subclasses that support painting.
The Canvas, Frame, Panel, and Applet classes support painting.

94. What invokes a thread's run() method?
After a thread is started, via its start() method or that of the Thread class, the JVM invokes the thread's run() method when the thread is initially executed.

95. What is the range of the char type?
The range of the char type is 0 to 2^16 - 1. 

96. In which package are most of the AWT events that support the event-delegation model defined?
Most of the AWT-related events of the event-delegation model are defined in the java.awt.event package. The AWTEvent class is defined in the java.awt package.

97. What is the difference between the Boolean & operator and the && operator?
If an expression involving the Boolean & operator is evaluated, both operands are evaluated. Then the & operator is applied to the operand. When an expression involving the && operator is evaluated, the first operand is evaluated. If the first operand returns a value of true then the second operand is evaluated. The && operator is then applied to the first and second operands. If the first operand evaluates to false, the evaluation of the second operand is skipped.

98. What is the immediate superclass of Menu?
MenuItem

99. What is the purpose of finalization?
The purpose of finalization is to give an unreachable object the opportunity to perform any cleanup processing before the object is garbage collected.

100. Which class is the immediate superclass of the MenuComponent class.
Object

101. Name three subclasses of the Component class.
Box.Filler, Button, Canvas, Checkbox, Choice, Container, Label, List, Scrollbar, or TextComponent

102. What is the immediate superclass of the Applet class?
Panel

103. What is the difference between a field variable and a local variable?
A field variable is a variable that is declared as a member of a class. A local variable is a variable that is declared local to a method.