You can install Tivoli Storage Manager V7.1 or higher by using the graphical user interface (GUI), the console wizard, or while in silent mode, with or without a response option. Tivoli Storage Manager’s version of the DB2 database and logs are installed along with the server. You cannot install and run Tivoli Storage Manager 7.1 server on a Windows system that already has DB2 installed on it, whether DB2 is installed by itself or as part of some other application. The Tivoli Storage Manager 7.1 server requires the installation and use of the DB2 version that is packaged with the Tivoli Storage Manager 7.1 server. No other version of DB2 can exist on the system. This is not a limitation with UNIX or Linux.
Steps to Install IBM Tivoli Storage Manager Server on Windows and UNIX
Installing IBM Tivoli Storage Manager V7.1 is a two step process. In the first step you have to install TSM Server components and in the second step you have to configure the TSM Server instance, Database and recovery log.
TSM V6.X and TSM V7.X installing follows the same procedure except the first step. In TSM V7.X, we have to install TSM V7.1 server components through a new interface called IBM Install Manager. And the second step is common in both the versions as shown in the below video.
Also Read: Different DSMADMC options to login to TSM Server
Also Read: Different DSMADMC options to login to TSM Server
Using the Tivoli Storage Manager installation software, you can install the following components:
- Tivoli Storage Manager Server
- Tivoli Storage Manager Server Languages
- Tivoli Storage Manager License
- Tivoli Storage Manager Devices
- Tivoli Storage Manager Storage Agent
It is not recommended to install TSM Server and Storage Agent on same machine.
Installing Tivoli Storage Manager Server
Follow the same steps in Windows & Unix machines to install TSM V7.1 Server
Step 1: Log on as an administrator and go to the directory where TSM Server V7.1 code is located. On AIX, Log in as the root user. If you do not log in as root, certain key Tivoli Storage Manager functions do not work properly.
ON AIX, Change file permissions by entering the following command and then extract the package.
chmod a+x 7.1.0.0-TIV-TSMALL-platform.bin
./7.1.0.0-TIV-TSMALL-platform.bin
Step 2: On Windows, Double click the install package to extract the package. It will take some time for extraction. This will open up the installation manager window as shown in the below screen, you need to select the components which you want to install. You have to use the installation manager interface for any future up-gradation or any new installation.
On AIX, Go to the directory where you have extracted the packages and run the install.bin file. Check the following link for installing TSM server components in AIX in console mode.

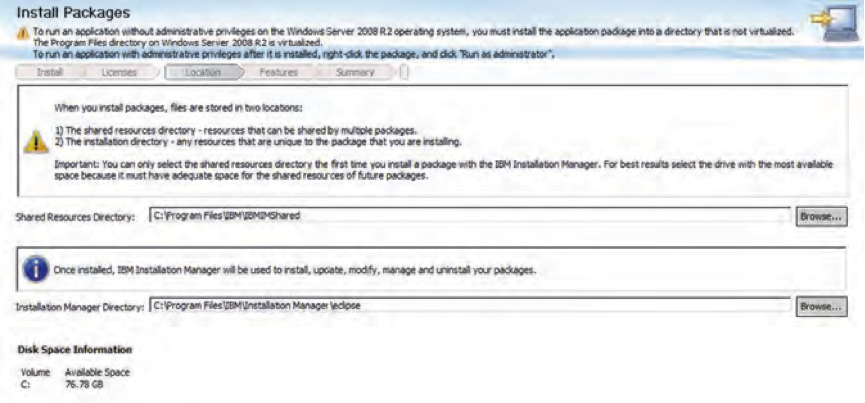
Next, select or choose the default location for TSM components installation.

The default location for Windows is C:\Program Files\Tivoli\TSM.
Step 3: In the next screens, you need to accept the license agreement, select languages and other options as shown in the video.
If you encounter any problems with the installation, directions refer you to the appropriate log files. The log for a new Windows server installation is the directory that is chosen for installation, look for the files log.txt and logs.zip. The log for a new AIX server installation is /var/tivoli/tsm.
Also Read: Commands to manage TSM server on HPUX server
Also Read: Commands to manage TSM server on HPUX server
- The Instance directory contains files for this server instance. The instance directory will include all Tivoli Storage Manager server files, such as the server options file (dsmserv.opt), the device configuration file (devconfig), and volume history file (volhist).
- Database directories
- Recovery log directories: Active log, Archive log, Active log mirror (optional), Archive failover log (optional).
- Also, create the user ID that owns the server instance. You use this user ID when you create the server instance
Check the following link to create DB and LOG directories for TSM V7.1 server instance in AIX
Step 5: After the successfull installation of TSM V7.1 server components, we have to configure the server instance and database. In the following video I used administrator id for configuration but it is recommended to use userid which you created in the previous step for server instance configuration. This way you can keep TSM server from unauthorised user access.
Now, Start the configuration wizard from the installation directory.
Windows: c:\Program Files\Tivoli\TSM\server\dsmicfgx.exe
UNIX and Linux: /opt/tivoli/tsm/server/bin/dsmicfgx
or you can open it from the START menu in windows as shown below.

On AIX, check the link to know how to configure TSM Server instance and database using dsmicfgx with screenshots.
Now, follow the steps as shown in the below video to configure the TSM V7.1 server instance, database and logs. Same procedure for TSM V6 and TSMV7.
Starting the TSM server instance
To start the server from the command line, use one of the following commands:
- For Windows: dsmserv –k server_key where server_key specifies the name of the Windows registry key where you retrieve information about the server. The default is Server1.
- For AIX and Linux: dsmserv –u instance_dir where instance_dir specifies an instance directory to use. This instance directory becomes the current working directory of the server.
If necessary, you can stop the server by issuing the halt command from the Tivoli Storage Manager administrative command line.
Default Installation Locations
For Windows, the default server installation directory is at the following location:
c:\Program Files\Tivoli\TSM\server.
For AIX and Linux, the default server installation directory is at the following location:
/opt/tivoli/tsm/server/bin or /opt/tivoli/tsm/server/bin64
After you install the Tivoli Storage Manager server and license, go to the Tivoli Storage Manager Administrative command line, start the server, and register the license. You install the license file during the server installation. Register the license on the Tivoli Storage Manager administrative command line, enter the following command to register the Tivoli Storage Manager Extended Edition
register license file=tsmee.lic
Configuring a new TSM Server Instance
If you install Tivoli Storage Manager Version 7.1.0 and you need to configure and initialize another server instance, use one of the following options:
1) Use the new instance wizard on your local system (dsmicfgx.exe).
2) Manually configure the new instance.
2) Manually configure the new instance.
Manually configure the new instance
To manually configure and start the Tivoli Storage Manager server, use the following steps as a guide
- Create a new server option, Copy the dsmserv.opt.smp sample file in the installation server directory to set up communications between client and server. Rename the copy to dsmserv.opt. Do this before you start the server for the first time.
- Define database and recovery log, Issue the dsmserv format command to initialize the database and recovery log.
- Start the server, Issue the dsmserv command.
For example, to install an additional server, set up an instance directory, and issue the DSMSERV FORMAT command with the -k (Windows) or -i (UNIX and Linux) parameter from that directory. That directory becomes the location of the server. The registry tracks the installed servers.
dsmserv -k server2 format dbdir=e:\tsmserv2\db activelogsize=4096activelogdir=f:\tsmserv2\
activelog archlogdir=g:\tsmserv2\archlog archfailoverlogdir=h:\tsmserv2\archfaillog mirrorlogdir=i:\tsmserv2\mirrorlog
If you are not in the instance directory when you start the server, you must specify the directory with the -i or -k
Uninstalling Tivoli Storage Manager using the wizard
- Start theInstallation Manager. On Windows, Open the Installation manager from the Start menu.On UNIX, In the directory where the Installation Manager is installed, go to the eclipse subdirectory (for example, /opt/IBM/InstallationManager/eclipse), and issue the ./IBMIM command.
- Click Uninstall.
- Select IBM Tivoli Storage Manager server, and click Next.
- Click Uninstall.
- Click Finish.
You cannot uninstall only one component of Tivoli Storage Manager. If you uninstall the server, all other components you previously installed are also removed. The uninstaller also cleans up the registry; however, you must clean out the temp directory.
PREVIOUS: 1.3 IBM Tivoli Storage Manager (TSM) V7 Product Family
NEXT: 2.2 Installing and Configuring TSM Backup Archive Client V7.1 on Windows and AIX
All Chapters: IBM Spectrum Protect (TSM) Basic Free Tutorials
PREVIOUS: 1.3 IBM Tivoli Storage Manager (TSM) V7 Product Family
NEXT: 2.2 Installing and Configuring TSM Backup Archive Client V7.1 on Windows and AIX
All Chapters: IBM Spectrum Protect (TSM) Basic Free Tutorials


in my company already tsm console mode is installed... how to enable gui mode
ReplyDeletehi i have to learn tsm does Aany one knows where is tsm institutae actually plz healp
ReplyDeleteHi Anil,
ReplyDeleteCan you help to know the exact link to get the software to download on unix box.
ftp://public.dhe.ibm.com/storage/tivoli-storage-management/maintenance/server/
DeleteHave you guys got Error 449 while formatting database?
ReplyDelete