After the successful installation of TSM for VE package on the Vstorage backup server, you need to configure TDP for Vsphere GUI to configure VM backups. This process will automatically register required client nodes and creates required client schedule services. You can also do these steps manually. It is recommended to do it through GUI to make configuration easier and you will be sure that you did not miss any steps in between. The below screenshots are taken from IBM for your understanding.
Configuring TSM for VE for protecting Virtual Machines
1) If you chose to enable access to the GUI via a web browser during installation process, the web browser will be automatically invoked after completion of the installation. If you wish to use this feature, click continue to this website.

You will see the below screen on a web browser, if you click Continue in the above figure. You can access the GUI via web browser by using URL https://hostname:9081/TsmVMwareUI/ or via the start menu from the vStorage backup server where the GUI is installed. Log in using vCenter Server credentials.

2) If you choose to Register the GUI as a vCenter Plug-in during installation, you can also access the GUI from the Solutions and Applications section of vCenter. Whether you use the web browser access or the vCenter plug-in access, the interface will look the same.

3) When you open the GUI for the first time, it will automatically launch the Configuration Wizard as below. If you are opening it for second time or later, you need to click EDIT CONFIGURATION tab. You just need to click NEXT to start the configuration.

4) Enter your TSM Server credentials here and click NEXT.

5) TDP for VMware requires several nodes to be defined on the TSM server to protect the entire VM infrastructure. The configuration wizard will create these nodes. This screen gives the option to assign a common prefix to these nodes as well as to select a TSM policy domain. The wizard will automatically place an underscore between the prefix and the rest of the node name. Select the desired Policy Domain and then click NEXT.

6) This step will register the Vcenter node in the TSM server. The first field will be pre-filled with a node name for the vCenter node in TSM. It consists of the node prefix if specified earlier followed by ‘_VC’ followed by the vCenter name as shown in the vCenter. You may modify the name if desired or use the generated default name. Check the ‘Register Node’ box and enter a password for the new node. The new node will be registered in TSM server automatically with the specified password & then click NEXT.

7) Similarly, you have to create the VMCLI node and register in the TSM server as above.

8) Select the datacenter to be managed, you will see all the available datacenters to be managed on the right side. Select the datacenter and click NEXT

9) This step will create the Datacenter Node and initial TSM Data Mover Node. The datacenter node name consists of the specified prefix followed by an underscore followed by the datacenter name. The Data Mover node name consists of the datacenter node name with a suffix of ‘_DM’. Each of these may be modified by highlighting the line containing the name and then either clicking on the node name or clicking on ‘Edit Node Name’.

Then you have to set the TSM node passwords for the Datacenter and Data Mover nodes. To set the password for a node, either highlight the line and click on ‘Set Password’, or click on ‘Not Set’. Enter a password for the selected node and click OK as shown below. Repeat the Set Password process for the other node(s) until all nodes show ‘Change’ in the Password column.

10) In this step, you have to decide whether to allow the wizard to create the Data Mover services. Note the ‘Create Services’ column with a checkbox for each Data Mover node. When this box is checked, the wizard will create the required option file and TSM client services for the Data Mover node. Remember that this checkbox should only be used for Data Mover nodes to be created on the vStorage backup server where this GUI is installed. Since this is the first Data mover node, tick the create services box and click NEXT.

When the ‘Create Services’ box is checked for a particular Data Mover, the wizard will create the required option file and TSM client services for the Data Mover node. This is optional. You may still create the option files and services manually. If you want to add a secondary vStorage backup server, the Data Mover option file and services should be created manually. If you leave the ‘Create Services’ box checked when creating the additional Data Mover node definition, the option file and services will be created on the original vStorage backup server rather than on the new server.
11) Here, the summary page will show all the nodes which are registered in the TSM server i.e vCenter Node, VMCLI Node, Datacenter Node and Data Mover Node.

12) In the next step, you should see the Data Mover verification successful. If you receive a failure on the ‘Verify Data Mover nodes’ task, it is likely due to the creation of the TSM services not yet being completed. If you receive a failure on the ‘Verify Data Mover nodes’ task, the Datacenter will show a warning icon.

There is a known issue in the older version of vCenter plug-in which does not set the vCenter credentials. This will prevent the datamover from being successfully validated. If you got stuck in this stage, you must log into the vStorage backup server, start the BA Client GUI using the generated dsm.<datamover>.opt file and set the credentials using the preferences editor. Restart the CAD service for the datamover, then retry the validation. This is not an issue with the web browser GUI.
13) Next, open the BA Client Preference editor by using dsmc -optfile=dsm.opt and update the Vmware Virtual Center User and Password in the VM Backup tab as shown below.

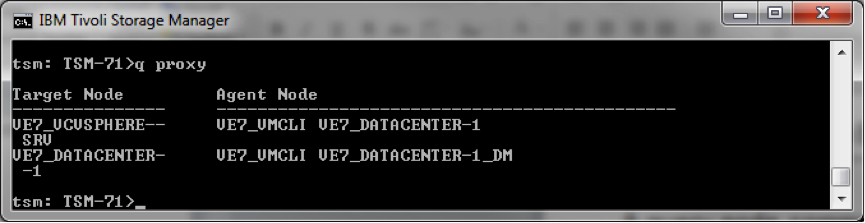
14) To check the configuration, you can login to TSM server and run query node and query proxy commands which shows the proxy relationship between the nodes which we have configured earlier.
15) A client option file will be created with the naming format dsm.<datamover>.opt in the default BA Client directory, You need to Copy the generated file to a file called dsm.opt. This the default option file used by the BA Client GUI and command line interfaces. This will allow the BA Client GUI and command line interfaces to be used for VM guest backup and full VM restore.
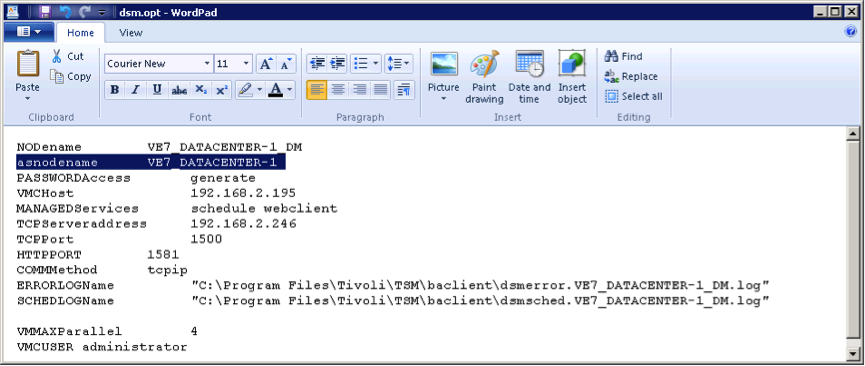
Edit the dsm.opt file and add the asnodename parameter with the node name of the datacenter node as shown above. This means that the backup will be performed by Data Mover node and the actual backup will be stored under the Data Center node name in TSM server.
Next, you can start taking manual VM backups or schedule backups through DP for Vsphere GUI.

the blog about tivoli storage manager is very useful and informative. thank you for sharing the blog with us.
ReplyDeleteDotnet Training in Chennai